Table of Contents
Introduction
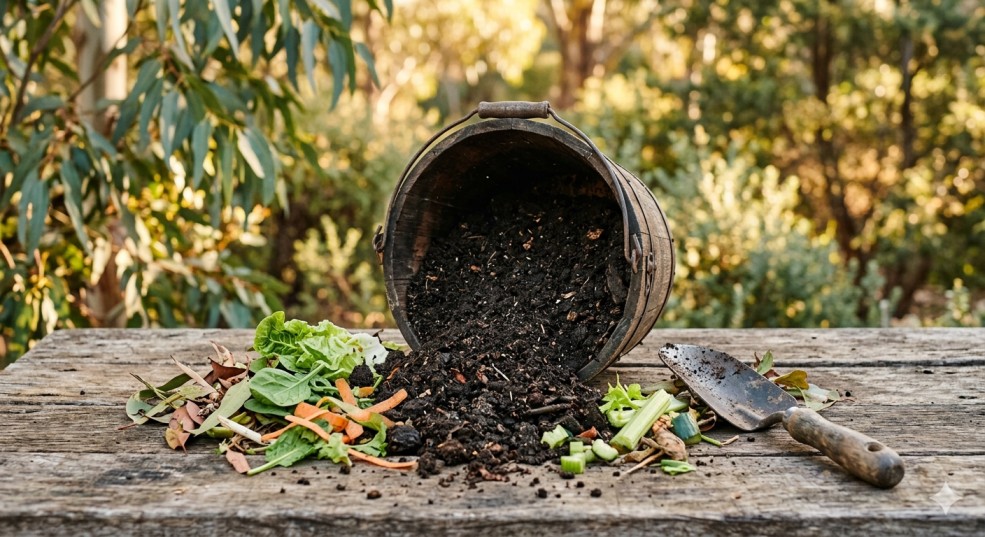
There’s a particular kind of disappointment that hits when you’ve spent a small fortune on bags of premium garden soil, lovingly planted your seedlings, watered them religiously, and then watched them sit there looking underwhelming. No explosive growth. No vibrant green leaves. Just plants that seem to be tolerating life rather than thriving in it.
You’re not alone. Australian gardeners across the country, from the sandy soils of Perth to the heavy clay of Melbourne’s eastern suburbs, face the same struggle. Store-bought compost and soil mixes are expensive, and honestly, the quality varies wildly from bag to bag.
But here’s the good news: you don’t need to keep handing over your hard-earned cash for something you can make yourself for free. Compost soil DIY is not only achievable for complete beginners, but it’s also one of the most satisfying things you’ll ever do in your garden. This guide will walk you through every single step, tailored specifically for Australian conditions, so you can transform kitchen scraps and garden waste into black gold that your plants will genuinely thank you for.
What Is Compost Soil?
Before we dive into the how-to, let’s get clear on what we’re actually making.
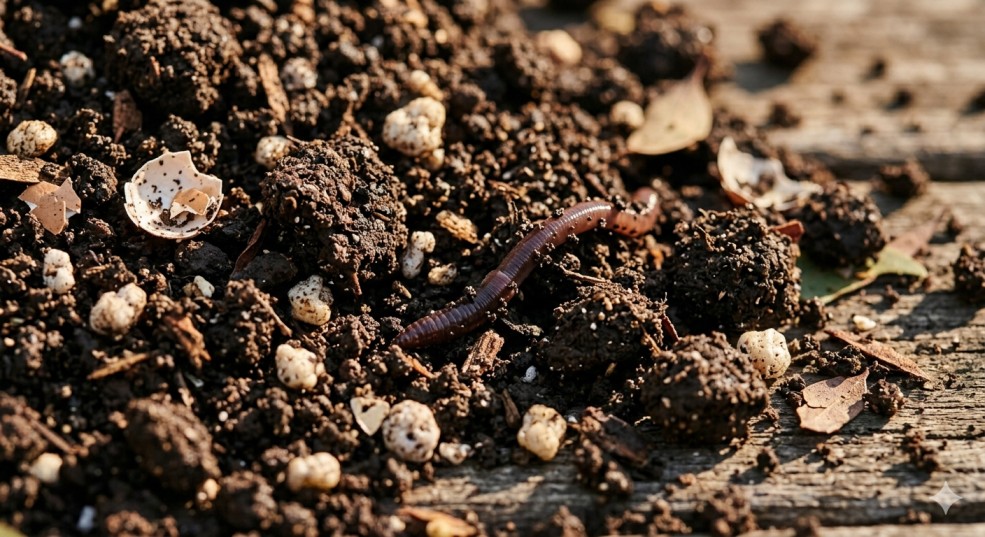
Compost is decomposed organic matter. That’s the simple definition. But what you end up with after weeks or months of patient waiting is so much more than just “rotted stuff.” Mature compost is a dark, crumbly, sweet-smelling material that’s absolutely teeming with beneficial microorganisms, fungi, and nutrients that plants can readily absorb.
Compost vs Soil vs Fertiliser: What’s the Difference?
This is where a lot of beginners get confused, so let’s clear it up right now.
Soil is the foundation, it’s the mineral-based material in your garden beds, composed of sand, silt, clay, and organic matter. Australian soils vary dramatically by region. If you’re in Sydney’s sandstone belt, you’re dealing with shallow, sandy soil that drains too quickly. In Adelaide or parts of regional Victoria, you might be battling heavy clay that turns to concrete in summer and sticky mud in winter.
Fertiliser is concentrated plant food. Think of it like a multivitamin for your garden. It provides specific nutrients (nitrogen, phosphorus, potassium) in readily available forms, but it doesn’t improve the actual structure of your soil.
Compost is the best of both worlds. It’s a soil conditioner that improves structure and a slow-release nutrient source that feeds plants over time. It helps sandy soils retain moisture and nutrients. It breaks up clay soils so roots can penetrate and water can drain properly. It’s not an exaggeration to say that compost fixes almost everything that’s wrong with Australian soils.
The Benefits of Compost at a Glance
- Improves soil structure – Creates air pockets for roots and drainage channels for water
- Adds slow-release nutrients – Feeds plants for months, not days
- Increases water retention – Crucial for Australian summers
- Suppresses plant diseases – Healthy soil biology crowds out pathogens
- Reduces landfill waste – Keeps kitchen scraps out of the bin
- Completely free – Once you’re set up, it costs nothing
Why DIY Compost Soil?
You might be thinking, “This sounds like work. Can’t I just buy a bag of compost from Bunnings?”
You absolutely can. But here’s why making your own compost soil DIY style is worth the minimal effort.
💰 Cost Savings That Add Up
Let’s do some quick maths. A 25L bag of decent organic compost in Australia will set you back anywhere from $8 to $15. If you’re filling raised garden beds or refreshing your entire garden twice a year, that adds up fast. A single raised bed might need 200-300 litres of compost annually. That’s potentially $100 or more per bed, every single year.
Meanwhile, you’re already producing the raw ingredients for free. Every banana peel, apple core, and wilted lettuce leaf in your kitchen bin is literally throwing away future compost. Your lawn clippings and autumn leaves are gold waiting to be harvested.
♻️ Waste Reduction You Can Feel Good About
Australians send about 7.6 million tonnes of food waste to landfill each year. When organic matter rots in landfill without oxygen, it produces methane, a greenhouse gas far more potent than carbon dioxide. By composting at home, you’re directly reducing your household’s environmental footprint. It’s one of those rare actions that benefits you and the planet simultaneously.
🌱 Better Plant Health, Guaranteed
Store-bought compost is a bit of a lottery. It’s been heat-treated, bagged, and sitting on a pallet for who-knows-how-long. The beneficial microbiology that makes compost truly magical is often dead on arrival.
Home-made compost is alive. When you dig it into your garden, you’re introducing billions of beneficial bacteria, fungi, protozoa, and nematodes that form a symbiotic relationship with your plant roots. This living soil food web helps plants access nutrients they couldn’t reach on their own, improves drought tolerance, and boosts natural pest resistance.
🇦🇺 Tailored for Australian Conditions
This is a big one. Australian summers are brutal. Our winters (in most regions) are mild but dry. Our native soils are ancient and often nutrient-poor. The compost you make at home, using local materials, is perfectly adapted to your specific microclimate and soil conditions.
If you’re growing vegies in Brisbane’s humid summers, your compost will be different from what someone in Hobart’s cooler climate produces. And that’s exactly how it should be.
Materials Needed for Compost Soil DIY
Alright, let’s get practical. You don’t need fancy equipment to start composting. You need two things: a container or space, and the right mix of ingredients.
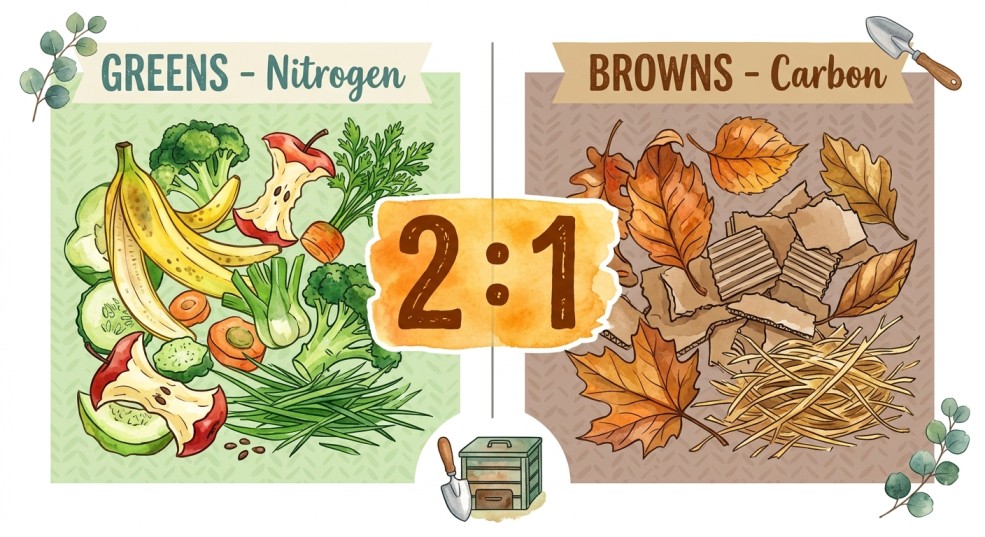
But before we get to the list, you need to understand the golden rule of composting: balance greens and browns.
Think of it like a diet for the microorganisms doing all the work. They need both nitrogen (for protein and reproduction) and carbon (for energy). Get the balance right, and you’ll have sweet-smelling compost in weeks. Get it wrong, and you’ll have a slimy, stinky mess.
🟢 Greens (Nitrogen-Rich Materials)
“Greens” are the wet, fresh, nitrogen-heavy ingredients. They’re usually green in colour, but not always, coffee grounds are brown but count as a green because they’re nitrogen-rich.
Good greens for your DIY compost:
- Fruit and vegetable scraps (peels, cores, wilted leaves)
- Fresh grass clippings (in thin layers only, they can mat down and go slimy)
- Coffee grounds and loose tea leaves
- Fresh garden weeds (before they’ve set seed)
- Spent flowers and green prunings
- Seaweed (rinse off salt first if you’re coastal)
- Manure from herbivores (chicken, cow, horse, sheep, aged is best)
Note for Australian gardeners: If you’re using manure, make sure it’s well-aged. Fresh manure can be too “hot” with ammonia and burn your plants or your compost pile.
🟤 Browns (Carbon-Rich Materials)
“Browns” are dry, woody, carbon-heavy materials. They provide structure, allow air to flow through the pile, and feed the fungi and bacteria that break everything down.
Good browns for Australian compost:
- Dry autumn leaves (gather them in bin bags during leaf-drop season)
- Shredded newspaper and plain cardboard (remove tape and glossy coatings)
- Straw and hay (great for rural and semi-rural gardeners)
- Wood chips and sawdust (untreated wood only)
- Dried grass clippings (let fresh clippings dry in the sun first)
- Egg cartons (the cardboard kind)
- Paper towel and napkins (unbleached is best)
The Magic Ratio: 2 Parts Brown to 1 Part Green
Here’s the simple formula that will prevent 90% of beginner composting problems:
For every bucket of kitchen scraps (greens), add two buckets of dry leaves or shredded cardboard (browns).
Why? Because greens break down fast and can become anaerobic (oxygen-starved) if there aren’t enough browns to create air pockets. Too many greens = slimy, smelly compost. Too many browns = nothing happens, pile sits cold and dormant.
When you get it right, the pile heats up within days and you can literally feel the warmth radiating from it. That’s the microorganisms partying.
What NEVER to Put in Your Compost
This is important for Australian gardeners especially, because our climate affects decomposition rates and pest attraction.
Avoid these at all costs:
- Meat, fish, bones, and fatty foods (attracts rats, mice, and flies)
- Dairy products (cheese, milk, yoghurt)
- Oils and greasy foods
- Dog or cat poo (can contain harmful pathogens)
- Diseased plants (you’ll spread the disease when you use the compost)
- Weeds with mature seed heads (you’ll plant weeds everywhere)
- Treated timber sawdust (contains arsenic or other preservatives)
- Glossy magazine paper (chemical coatings)
- Large woody branches (they’ll take years to break down)
Step-by-Step Guide: How to Make Compost Soil DIY
Now we’re getting to the good stuff. This is your practical, no-nonsense guide to actually making compost. I’m going to walk you through every step, answering the questions that most beginners are too embarrassed to ask.
Step 1: Choose Your Composting Method
Your setup will depend on your space, budget, and how hands-on you want to be. Here are the three main options for Australian homes.
Option A: The Classic Compost Bin
This is the most common approach for suburban gardens. You can buy a black plastic compost bin from Bunnings, your local council (many offer subsidised bins), or online for $50-$100. These bins are tidy, keep pests out reasonably well, and hold heat efficiently.
Pros: Neat appearance, retains heat and moisture, keeps most pests out, council rebates often available.
Cons: Limited capacity, harder to turn the contents, base sits on soil so you need a spot with dirt underneath.
Option B: The Open Compost Pile
This is old-school composting at its purest. You simply designate a corner of your garden, ideally 1m x 1m minimum, and build your pile directly on the soil. You can contain it with pallets, chicken wire, or nothing at all.
Pros: Free, unlimited capacity, easy to turn with a garden fork, excellent for larger gardens with lots of material.
Cons: Looks messy, can attract pests if not managed well, dries out faster in Australian sun, harder to keep hot in winter.
Option C: The Compost Tumbler
A tumbler is a sealed barrel mounted on a frame that you can spin to mix the contents. They’re elevated off the ground, which is great for pest control and accessibility.
Pros: Super easy to turn (just spin the handle), fast composting (some claim 4-6 weeks), pest-proof, good for small spaces.
Cons: Expensive ($150-$400+), limited capacity, can be heavy to turn when full, requires careful moisture monitoring.
My recommendation for Australian beginners: Start with a standard black compost bin from your local council. Many councils in Melbourne, Sydney, Brisbane, and Perth offer them at heavily subsidised prices (sometimes as low as $30). They’re forgiving, effective, and you can always expand later.
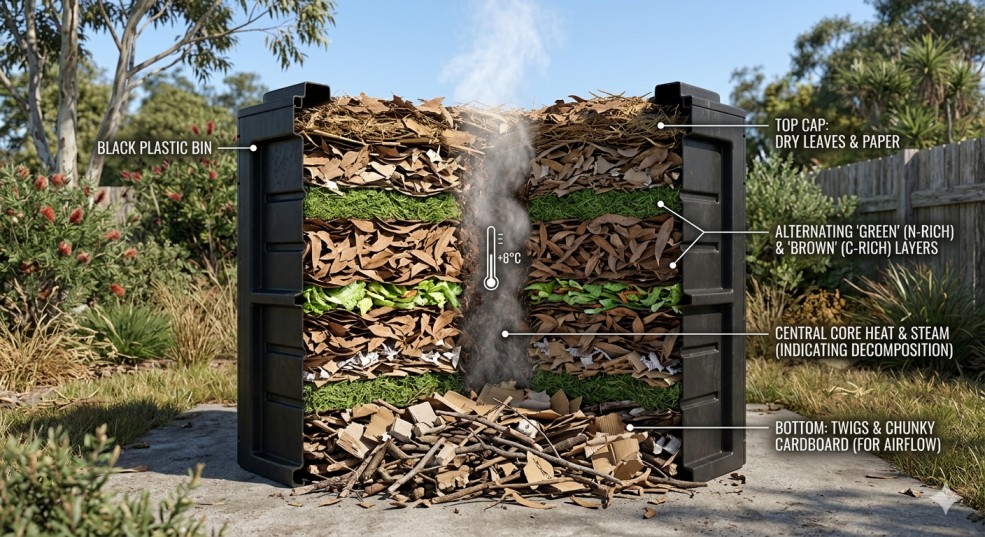
Step 2: Layer Your Materials Like a Lasagne
This is where the magic starts. The layering method isn’t just for show, it creates the perfect environment for decomposition from day one.
The base layer (essential): Start with a 10-15cm layer of coarse browns at the very bottom. Twigs, small branches, wood chips, or chunky cardboard. This creates an air chamber underneath your pile, allowing oxygen to flow up from the soil and preventing the bottom from becoming a soggy anaerobic mess.
Then alternate layers:
- Brown layer (10cm) – dry leaves, shredded paper, straw
- Green layer (5cm) – kitchen scraps, fresh grass, coffee grounds
- Brown layer (10cm)
- Green layer (5cm)
- Brown layer on top (this final cap of browns suppresses odours and flies)
Think of it like building a soil sandwich. The brown layers are the bread, the green layers are the filling. Always finish with a brown “lid” on top.
Pro tip for Australian summers: During hot, dry periods, make your brown layers slightly thicker. They’ll hold moisture better and prevent the pile from drying out too fast.
Step 3: Add Moisture (The Damp Sponge Test)
Composting microorganisms need water to survive and work. Too dry and they go dormant. Too wet and they drown (and your pile goes anaerobic and stinks).
The gold standard test: Grab a handful of compost material and squeeze it.
- Perfect: A few drops of water come out, like a wrung-out sponge. The material feels damp but not soggy.
- Too dry: Nothing comes out, material feels dusty and light. Add water.
- Too wet: Water streams out freely. Add more browns immediately.
In most Australian climates, you’ll need to water your compost pile occasionally, especially in summer. A quick spray with the hose every few weeks is usually enough. If you’re in a wet climate like Far North Queensland or Tasmania, you might need to cover your pile with a tarp to prevent it from becoming waterlogged.
Step 4: Turn the Compost (Introduce Oxygen)
This is the step that separates fast compost from slow compost. Turning, mixing, and aerating the pile introduces fresh oxygen that fuels the aerobic bacteria doing the heavy lifting.
How often should you turn?
- Hot composting (fast): Every 3-7 days
- Warm composting (medium): Every 1-2 weeks
- Cold composting (slow): Once a month, or never
How to turn properly:
Use a garden fork or compost aerator tool. The goal is to move material from the centre to the outside, and from the outside to the centre. The centre is where the heat is generated, so you want to give all the material a turn in the hot zone.
If you have a tumbler, just spin it a few times whenever you add new material.
The smell test: A healthy compost pile smells earthy and pleasant, like a forest floor after rain. If it smells rotten, sour, or like ammonia, it needs turning and more browns immediately.
Step 5: Wait and Monitor
Composting is not instant. It’s a biological process that takes time. How much time depends on your method, climate, and how actively you manage the pile.
General timelines for Australian conditions:
| Method | Time to Finished Compost |
|---|---|
| Hot composting (frequent turning, perfect ratio) | 4-8 weeks in summer, 8-12 weeks in winter |
| Warm composting (occasional turning) | 3-6 months |
| Cold composting (add as you go, minimal turning) | 6-12 months |
| Worm farming | 2-3 months for castings |
What to watch for:
- Steam rising on cool mornings – This is a great sign. It means your pile is hot and active.
- Volume decrease – A working compost pile shrinks dramatically. It’s normal for it to reduce by 50% or more.
- Change in appearance – Ingredients become unrecognisable over time.
- Presence of worms and insects – Good! They’re part of the ecosystem.
Best Composting Methods in Australia
Different methods suit different lifestyles, climates, and garden sizes. Here’s a breakdown of the three main approaches and where they work best in Australia.
Hot Composting (The Speed Demon)
Hot composting is for the enthusiastic gardener who wants results fast. The goal is to create a large enough pile (at least 1 cubic metre) with the perfect carbon-to-nitrogen ratio so that thermophilic bacteria kick in and raise the internal temperature to 55-70°C.
Benefits:
- Fastest method (4-8 weeks)
- Kills weed seeds and pathogens
- Produces very fine-textured compost
Drawbacks:
- Requires regular turning (weekly)
- Needs a large volume of material at once
- More monitoring required
Best for: Serious veggie gardeners, larger properties, spring and summer composting.
Cold Composting (The Laid-Back Approach)
Cold composting is simply piling up materials and letting nature take its course with minimal intervention. You add to the pile as you generate waste, turn it occasionally (or not at all), and eventually harvest from the bottom.
Benefits:
- Minimal effort required
- Works with small, ongoing additions
- Good for patient gardeners
Drawbacks:
- Slow (6-12 months)
- Weed seeds may survive
- Can attract pests if not covered
Best for: Busy households, ornamental gardens, people who want to reduce waste without a time commitment.
Worm Composting (The Apartment Dweller’s Dream)
Worm farming is technically vermicomposting, using compost worms (tiger worms, red wigglers) to break down kitchen scraps into rich castings. It’s perfect for small spaces because a worm farm can live on a balcony, in a laundry, or even under the kitchen sink.
Benefits:
- Can be done indoors
- Produces premium “black gold” castings
- Very fast (2-3 months)
- Worm “juice” is an excellent liquid fertiliser
Drawbacks:
- Worms need care (temperature, moisture, feeding)
- Can’t process large volumes
- Not suitable for garden waste
Best for: Apartment dwellers, small households, serious indoor plant enthusiasts.
Aussie worm tip: In summer, keep your worm farm in the shade. Temperatures over 30°C will kill your worms. In winter in cooler climates (Canberra, Hobart, Blue Mountains), bring the farm into a garage or sheltered spot.
Common Mistakes to Avoid
I’ve made every single one of these mistakes so you don’t have to. Here’s what goes wrong and how to fix it.
🚫 Mistake 1: Too Wet or Too Dry
Symptoms of too wet: Slimy texture, foul rotten-egg smell, flies everywhere.
Fix: Add lots of dry browns immediately, shredded cardboard, dry leaves, sawdust. Turn the pile to incorporate air. If it’s really bad, spread the pile out on a tarp in the sun for a day to dry out, then rebuild.
Symptoms of too dry: Nothing happening, materials look unchanged, pile is cold.
Fix: Water thoroughly with a hose, turning as you go. Cover with a tarp or lid to retain moisture.
🚫 Mistake 2: Bad Smells
Ammonia smell: Too many greens (nitrogen). Add browns and turn.
Rotten egg smell: Anaerobic conditions (not enough oxygen). Turn immediately and add browns.
General stink: You’ve added something you shouldn’t have, meat, dairy, or oils. Remove offending material if possible, add browns, and turn.
🚫 Mistake 3: Not Turning the Compost
I get it. Turning compost is not the most glamorous gardening task. But a pile that never gets turned will take forever to decompose, and the bottom will likely go anaerobic while the top stays dry.
Set a calendar reminder if you have to. Even once a month makes a huge difference.
🚫 Mistake 4: Adding Meat, Dairy, or Oily Foods
This is the number one reason people get rats in their compost. Australian cities have healthy rat populations, and they will find your compost bin if you’re offering them a buffet of dinner scraps.
Stick to fruit and vegetable waste, coffee grounds, and garden clippings. If you want to compost cooked food waste, look into a bokashi bin system instead.
🚫 Mistake 5: Composting the Wrong Weeds
Some weeds are absolute survivors and will happily regrow from tiny root fragments in your compost. In Australia, watch out for:
- Kikuyu grass runners
- Couch grass
- Oxalis bulbs
- Nutgrass tubers
- Wandering jew stems
Either hot compost these (to kill them with heat) or dispose of them in your green waste bin where commercial composting reaches much higher temperatures.
How to Know When Your Compost Is Ready
After weeks or months of patience, how do you know when your compost soil DIY project is actually finished?
Here’s the checklist for mature, garden-ready compost:
✅ Appearance
Finished compost is dark brown to black and has a crumbly, soil-like texture. You should not be able to identify the original ingredients. No banana peels, no eggshell fragments (small bits are fine), no visible leaves.
✅ Smell
It should smell earthy and pleasant, like a forest floor or fresh soil after rain. There should be zero sour, ammonia, or rotten odours.
✅ Temperature
An active compost pile generates heat. A finished pile is ambient temperature, the same as the surrounding air and soil. If it’s still warm in the centre, it’s still working.
✅ The Bag Test (Optional but Fun)
Put a handful of compost in a sealed plastic bag for 24 hours. When you open it, it should smell the same earthy and fresh. If it smells sour or unpleasant, it needs more time to finish decomposing.
How to Use Your DIY Compost Soil
You’ve made it! Now what do you actually do with this black gold?
🌿 Garden Beds (Vegetable and Ornamental)
This is where compost shines brightest. For new garden beds, mix compost into the top 15-20cm of soil at a ratio of about 1 part compost to 3 parts soil. For established beds, apply a 5cm layer as mulch and let the worms and rain work it into the soil over time.
Australian seasonal tip: Apply compost in early spring before planting summer crops, and again in autumn to prepare for winter vegies. This gives the soil biology time to establish before the growing season.
🪴 Pots and Containers
Compost is too rich to use straight in pots, it can burn roots and hold too much moisture. Mix it with potting mix at a ratio of 1 part compost to 4 parts potting mix. Your container plants will love the slow-release nutrition.
🌱 Lawn Top Dressing
Spread a thin layer (1-2cm) of fine compost over your lawn in spring or autumn. Rake it in lightly, water well, and watch your grass green up without chemical fertilisers.
🕳️ Planting Holes
When planting trees, shrubs, or perennials, mix a handful of compost into the backfill soil. It helps the plant establish and reduces transplant shock.
🍵 Compost Tea
Steep a shovel-full of finished compost in a bucket of water for 24-48 hours, stirring occasionally. Strain and use the “tea” as a liquid fertiliser for seedlings and hungry plants. Dilute to the colour of weak black tea before applying.
Compost Soil DIY for Small Spaces
Not everyone has a big backyard with room for a three-bin composting system. If you’re in an apartment, townhouse, or just have a tiny courtyard, you can still make compost soil DIY style.
Balcony Composting with a Worm Farm
This is hands-down the best option for apartment dwellers. A worm farm takes up about the footprint of a large esky and can process the kitchen scraps of a small household. You get worm castings (solid fertiliser) and worm juice (liquid fertiliser) in return.
Setup: Place your worm farm in a shaded spot on your balcony. Australian sun will cook your worms if the farm is in direct afternoon sun. In winter in southern states, move it to a sheltered corner.
What worms eat: Fruit and veg scraps, coffee grounds, tea bags, crushed eggshells, small amounts of bread and pasta.
What worms don’t eat: Citrus, onion, garlic, spicy foods, meat, dairy.
Indoor Bokashi Bins
Bokashi is a Japanese fermentation method that pickles food waste (including meat and dairy!) using beneficial microbes. It doesn’t produce finished compost indoors; instead, you get pre-composted material that you then bury in soil or add to an outdoor compost pile to finish.
Why it’s great for small spaces: No smells, no pests, tiny footprint (fits under the sink), can process ALL kitchen waste.
The process: Add food scraps, sprinkle with bokashi bran, press down, seal lid. Repeat until full, then let ferment for 2 weeks. Bury the contents in a garden bed or pot.
Small Tumbler on a Balcony
If you have a slightly larger balcony or courtyard, a compact compost tumbler (60-120L capacity) can work well. Just be mindful of weight, a full tumbler is heavy, so place it on a sturdy surface.
Tips for balcony tumblers:
- Place a tray underneath to catch any drips
- Keep it in shade to prevent overheating
- Be extra careful with moisture tumblers can get soggy fast
FAQ Section
How long does DIY compost take?
It depends entirely on your method. Hot composting with regular turning can produce finished compost in 4-8 weeks during warm weather. Cold composting takes 6-12 months. Worm farms produce castings in 2-3 months. The Australian climate, particularly in warmer regions, speeds up decomposition compared to cooler climates.
Can I compost in winter in Australia?
Absolutely. Composting doesn’t stop in winter, it just slows down. In southern states (Victoria, Tasmania, southern WA and SA), your pile might go dormant during the coldest months but will spring back to life as temperatures rise. In northern Australia, winter is actually the perfect composting season because it’s not too hot and not too wet.
Winter tip: Insulate your bin with old carpet, cardboard, or straw bales around the outside to retain what little heat is generated.
What should NOT go into compost?
- Meat, fish, bones
- Dairy products
- Oils and grease
- Dog or cat faeces
- Diseased plants
- Weeds with seed heads or persistent runners
- Treated timber products
- Glossy or coated paper
- Large branches or woody stems (unless chipped)
How to speed up composting?
Six proven accelerators:
- Chop everything smaller – More surface area = faster decomposition. Run over leaves with the mower, chop kitchen scraps finely.
- Perfect your ratio – Aim for 2:1 browns to greens by volume.
- Turn more frequently – Every 3-4 days for hot composting.
- Add a handful of finished compost or soil – Introduces beneficial microbes.
- Use a compost activator – Commercially available, or just add comfrey leaves, nettles, or aged manure.
- Keep it moist – Don’t let the pile dry out, especially in Australian summers.
Can I compost citrus and onions?
This is a common question in Australia, where backyard citrus trees are everywhere. Yes, you can compost citrus peels and onion skins, but in moderation. They’re slightly antimicrobial (which is why they break down slowly) and worms don’t love them. Chop them finely and mix well with browns. Avoid adding huge quantities at once.
Why is my compost full of flies?
Flies are attracted to exposed food scraps. Always cover fresh kitchen scraps with a layer of browns (leaves, cardboard, straw) immediately after adding them. This “cap” suppresses odours and blocks fly access. If you already have a fly problem, add a thick layer of browns on top and leave the lid off for a day, the flies will leave.
Do I need to add lime to compost?
Not usually. Many old gardening books recommend adding lime to “sweeten” compost, but it’s unnecessary for most Australian conditions. In fact, adding lime can cause nitrogen loss as ammonia gas. Only add lime if your finished compost is being used on very acidic soil and you specifically want to raise pH.
Pro Tips for Australian Composters
These are the little tricks that make composting easier and more successful in our unique climate.
🌱 Chop Everything Smaller
This is the single most effective speed tip. A whole apple takes weeks to break down. An apple chopped into eight pieces takes days. Run your mower over fallen leaves before adding them. Chop kitchen scraps roughly with a spade before tossing them in. More surface area means more access for decomposer organisms.
🚀 Use a Natural Compost Accelerator
Comfrey is a compost super-plant. Its leaves are rich in nitrogen and contain natural compounds that speed decomposition. If you have space, plant a comfrey patch near your compost area. A handful of fresh comfrey leaves layered into your pile works wonders.
Other natural accelerators:
- Aged chicken manure
- Nettle leaves (wear gloves!)
- Yarrow
- Human urine (yes, really diluted and added occasionally provides a nitrogen boost)
☔ Cover Your Pile in Rain
In wet periods, think La Niña summers in eastern Australia, your compost can become waterlogged. A simple tarp or piece of corrugated iron over the top prevents this while still allowing some airflow. In dry periods, the cover works in reverse, preventing moisture loss.
🐜 Embrace the Bugs
A healthy compost pile is an ecosystem. You’ll see slaters (woodlice), earwigs, millipedes, beetles, and worms. These are all decomposers doing their job. The only bugs to watch for are large numbers of flies (indicates exposed food) or cockroaches (indicates dry conditions—add water and browns).
🗑️ Council Compost Bins Are Your Friend
Many Australian councils sell subsidised compost bins and worm farms. Check your local council website before buying retail. Prices can be half of what you’d pay at a hardware store, and some councils even offer free composting workshops.
📍 Position Matters
Place your compost bin or pile:
- On bare soil (so worms and microbes can migrate up)
- In partial shade (full sun in Australia dries it out too fast)
- Convenient to the kitchen (you’ll actually use it)
- Away from timber structures (termites are a real concern in Australia)
Conclusion
Making your own compost soil DIY isn’t just about saving money, though that’s a nice bonus. It’s about closing the loop in your garden. It’s about transforming what would be waste into something that nourishes new life. It’s about building soil that will support healthy plants for years to come.
The first time you dig your hands into a pile of finished compost that you made from nothing but kitchen scraps and autumn leaves, you’ll understand. There’s a deep satisfaction in knowing exactly what’s in your soil, in watching your plants respond with vigorous growth, in knowing you’re doing something genuinely good for your little patch of earth.
And honestly? It’s easier than you think. Nature does almost all the work. Your job is simply to provide the ingredients and the occasional turn of a fork.
So here’s my challenge to you: Start today. Even if it’s just a small bucket on your balcony with some worms. Even if it’s a simple pile in the back corner of the garden. Take that first step toward making your own compost.
Your plants will thank you. Your wallet will thank you. And somewhere, a landfill will be just a little bit emptier because of you.
Happy composting, Australia. 🌱
1 thought on “Compost Soil DIY: How to Make Rich Organic Compost at Home (Beginner’s Guide Australia 2026)”