Let me tell you a secret about that bin under your sink. It’s not just a bin. It’s a treasure chest you’re throwing away every week. Those coffee grounds, vegetable peels, and eggshells? They’re not waste. They’re the key to the richest, healthiest garden you’ve ever grown.
I know what you’re thinking. Composting kitchen waste Australia sounds messy. Complicated. Something that’ll attract flies and smell up the backyard. What if I told you the opposite is true? That a properly managed compost system has no bad odors? That it’s simpler than following a recipe? And that you can start today, even if you live in an apartment?
For years, I threw away what my garden desperately needed. I bought bagged compost while my kitchen “waste” went to landfill, creating methane and wasting precious resources. Then I discovered a simple system that changed everything. Now, my kitchen bin is mostly empty, and my garden has never been more vibrant.
This isn’t just another “how to compost” article. This is your complete 2024 blueprint. We’ll walk through seven clear steps, tackle every “what if,” and answer every question you’re too embarrassed to ask. By the end, you’ll have a simple, foolproof system for composting kitchen waste Australia that fits your lifestyle and space.
Ready to turn your scraps into soil? Let’s begin.
Table of Contents
The Powerful Truth: Why Your Kitchen Waste Matters More Than You Think
Before we get to the “how,” let’s talk about the “why.” Understanding the impact of composting kitchen waste Australia transforms it from a chore into a mission.
First, the environmental reality is staggering. According to the Australian Government’s National Food Waste Strategy, Australian households throw away about 2.5 million tonnes of food each year. That’s over $2,500 worth of food per household. When this organic matter rots in landfill, it decomposes without oxygen in a process called anaerobic digestion. This produces methane, a greenhouse gas 28 times more potent than carbon dioxide over a 100-year period.
By choosing composting kitchen waste Australia, you are personally intercepting this waste stream. You’re stopping methane at its source and transforming a climate problem into a climate solution. It’s one of the most direct and powerful environmental actions you can take.
Second, you’re building wealth for your garden. Store-bought fertilizers and bagged soil are expensive and often full of synthetic chemicals. The compost you create is free, 100% natural, and superior to anything you can buy. It’s teeming with beneficial microbes and fungi that create a living soil ecosystem. This “black gold” improves soil structure, helps retain moisture (crucial in our climate), and provides a slow-release buffet of nutrients for your plants.
Finally, you’re closing the loop in your own home. There’s a profound satisfaction in this cycle. You eat food, you compost the scraps, you grow more food. It reduces your waste bill, your garden budget, and your environmental footprint. It’s the cornerstone habit of a truly sustainable Aussie backyard.
The 7-Step System to Master Composting Kitchen Waste Australia
Forget overwhelming advice. Here is your complete, sequential system. Follow these seven steps in order, and you’ll build a composting habit that lasts.
Step 1: The Mindset Shift – See Scraps, Not Waste
Your first task isn’t buying anything. It’s changing how you see what’s in your kitchen.
Start by observing. For one week, pay attention to what you throw in the bin. Coffee grounds, tea bags, onion skins, carrot tops, apple cores. Mentally label them not as “rubbish,” but as “future soil.” This simple shift is the foundation of successful composting kitchen waste Australia.

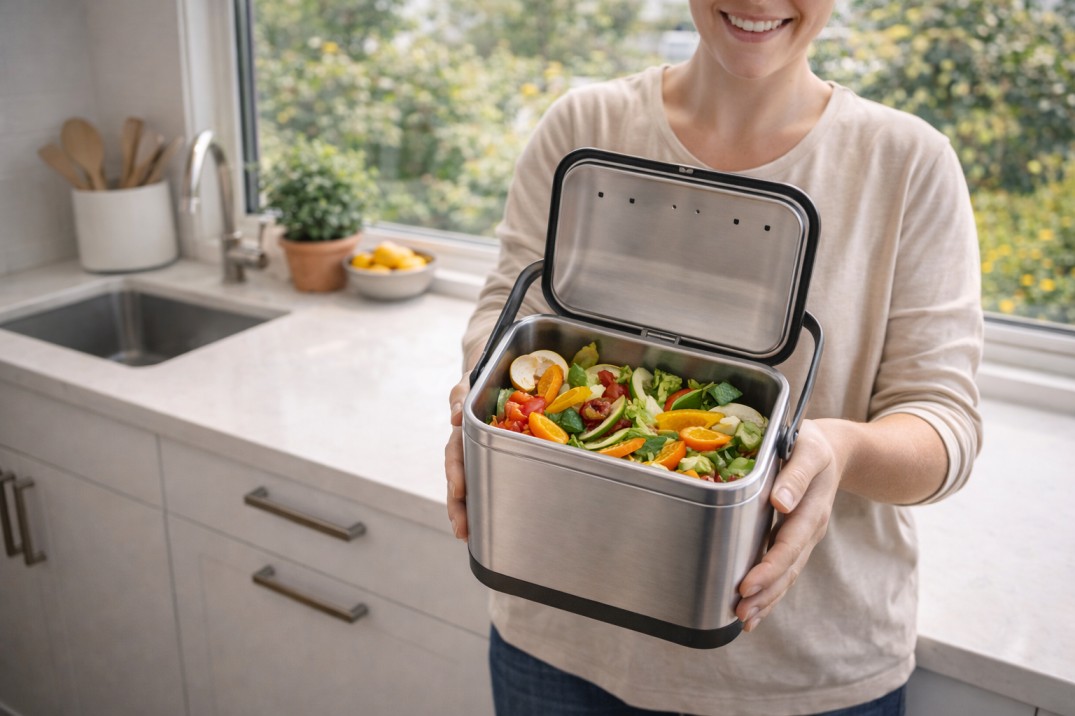
Step 2: Assemble Your Indoor Arsenal – The Kitchen Caddy
You need a convenient, dedicated place to collect scraps. This makes the habit effortless.
Choosing Your Caddy:
- Size: Opt for a 1-2 litre container. Small is key it encourages you to empty it outside regularly, preventing odors.
- Features: Look for a model with a tight-fitting lid and a handle. A charcoal filter in the lid is a game-changer for trapping any potential smells.
- The Free Option: An old ice cream tub or large yogurt container with a lid works perfectly.
Pro Placement Tip: Keep it on your kitchen bench or under the sink. If it’s out of sight, it’s out of mind. Make it easy.
Step 3: Learn the Sacred “Greens & Browns” Balance (The Golden Rule)
This single principle makes or breaks your compost. Everything in composting is about balancing two ingredients:
“Greens” (Nitrogen-Rich – Your Kitchen Waste)
These are your moist, nutrient-dense materials. They provide the protein that fuels the decomposing microbes.
- Fruit & Vegetable Scraps: Peels, cores, ends, spoiled produce.
- Coffee & Tea: Grounds, filters, loose-leaf tea, paper tea bags (remove staples).
- Grains: Stale bread, pasta, rice, cereal (in moderation).
- Eggshells: Crushed (they add calcium and grit, though they break down slowly).
“Browns” (Carbon-Rich – The Dry Bulking Agent)
This is what most beginners forget. “Browns” provide carbon (energy), create crucial air pockets, and prevent a smelly, slimy mess.
- Dry Leaves: The absolute best. Collect bags of them in autumn!
- Cardboard: Uncoated, shredded (egg cartons, toilet rolls, pizza boxes without grease).
- Paper: Shredded newspaper, office paper, paper towels (unbleached is best).
- Straw or Sugar Cane Mulch: Excellent for airflow.
The Non-Negotiable Golden Rule:
For every one part “greens” from your kitchen, you must add at least one part “browns” to your outdoor compost pile. A 1:1 ratio is your target. This balance prevents odors, deters pests, and creates perfect compost.

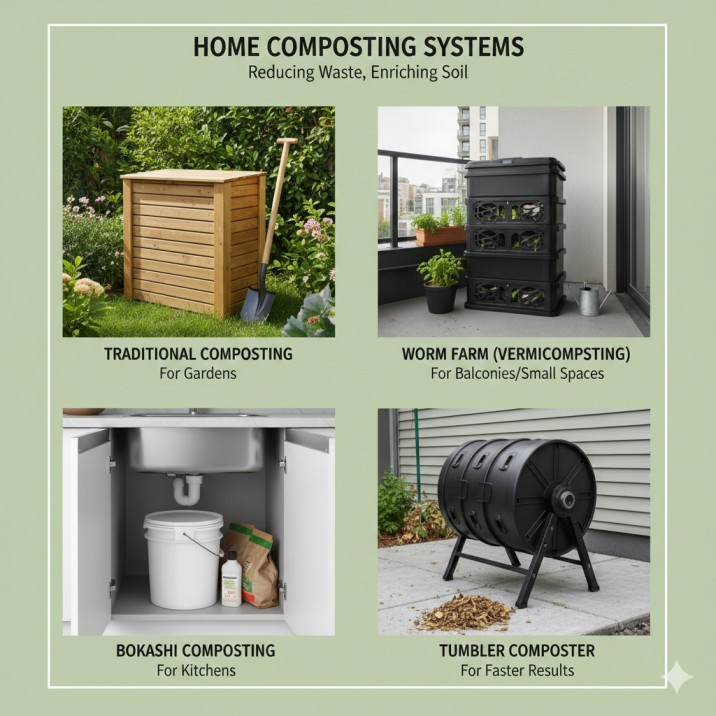
Step 4: Choose Your Outdoor Digestion System
Where does your full caddy go? Your choice depends on your space and goals. This is a key decision in your composting kitchen waste Australia journey.
System 1: The Classic Backyard Compost Bin
- Best for: Homes with a garden patch.
- How it works: A lidded plastic or timber bin where layers decompose over months. You add from the top and harvest from the bottom.
- Pro Tip: Many local councils sell these at a heavy discount—always check first!
System 2: The Worm Farm (Vermicomposting)
- Best for: Apartments, balconies, small courtyards, and families.
- How it works: Special tiger worms live in stacked trays, consuming your scraps and producing liquid fertilizer and solid “castings.”
- Why it’s great: Odorless, compact, and fast. It’s the perfect entry point. For a deep dive, see our complete guide to starting a worm farm for beginners Australia.
System 3: The Bokashi Bucket (Fermentation)
- Best for: Apartments, people who want to compost all food waste (including meat/dairy), or as a pre-composting step.
- How it works: An anaerobic system where you ferment scraps with a special bran. The pre-compost is then buried.
- Why it’s great: No odors, works with all food, and is very fast.
System 4: The Tumbling Composter
- Best for: Gardeners who want fast results and easy turning.
- How it works: A barrel on a frame you spin to aerate. Speeds up decomposition significantly.
- Why it’s great: Very efficient, pest-proof, and great for larger volumes of composting kitchen waste Australia.
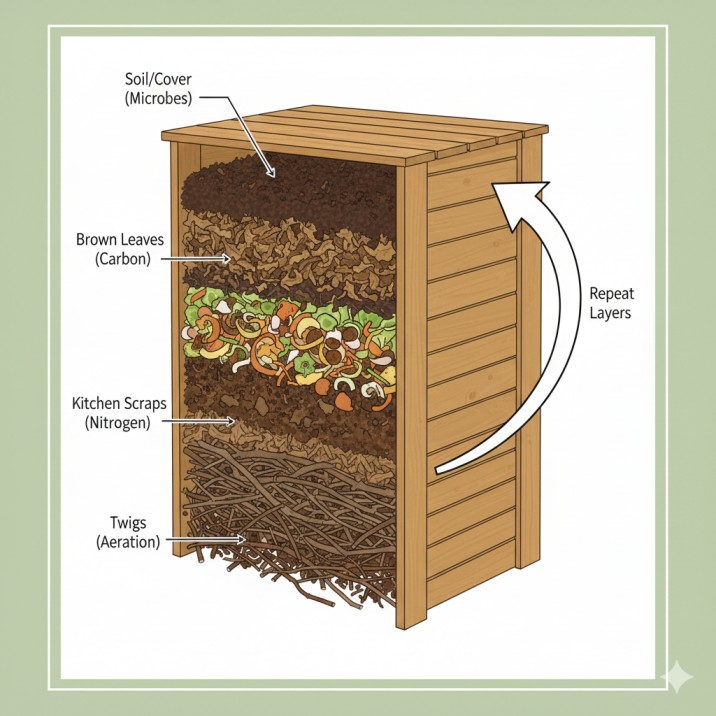
Step 5: Build Your First “Compost Lasagne” & Master Maintenance
With your system chosen, it’s time to build your first pile.
The Build (For a Bin or Pile):
- Base Layer (10cm): Start with coarse “browns” like small twigs or stalks for bottom airflow.
- Brown Layer (15cm): Add your dry leaves or shredded cardboard.
- Green Layer (5-10cm): Add your first kitchen caddy of scraps.
- Cover Layer (5cm): Lightly cover the scraps with soil, finished compost, or more “browns.”
- Moisten: Lightly water the layer so it feels like a damp, wrung-out sponge.
- Repeat: Continue the lasagne: Browns, Greens, Cover, Moisture.
The Simple Maintenance Routine:
- Turning (Weekly/Bi-weekly): Use a garden fork or compost aerator to mix the pile. This injects oxygen, which is like rocket fuel for microbes. It’s the single best thing you can do to speed up the process and prevent smells.
- The Moisture Check (The Squeeze Test): Grab a handful from the center. Squeeze. If one or two drops of water come out, it’s perfect. If it’s dripping, add “browns.” If it’s dry and crumbly, add water.
Step 6: Troubleshoot Like a Pro – Fixes for Common Problems
Even with the best system, you might hit a snag. Here’s your quick-reference fix-it guide.
- Problem: Rotten, putrid smell.
- Diagnosis: Too many “greens,” too wet, not enough air (anaerobic).
- Fix: Turn the pile immediately. Mix in a large amount of dry “browns” (shredded cardboard, dry leaves).
- Problem: Pile is not heating up or breaking down.
- Diagnosis: Too dry, too small, or needs more nitrogen.
- Fix: Check moisture and water if dry. Ensure pile is at least 1m³ to retain heat. Add a high-nitrogen “green” like fresh grass clippings or coffee grounds.
- Problem: Fruit flies or vinegar flies.
- Diagnosis: Food scraps are exposed on the surface.
- Fix: Always bury new scraps under at least 10cm of “browns” or soil. Ensure your bin lid is secure.
- Problem: Rodents or possums showing interest.
- Diagnosis: You’re composting forbidden items (meat, oils, bread crusts) or the bin isn’t secure.
- Fix: Stick strictly to plant-based scraps. Use a bin with a snug, lockable lid and a fine wire mesh base.
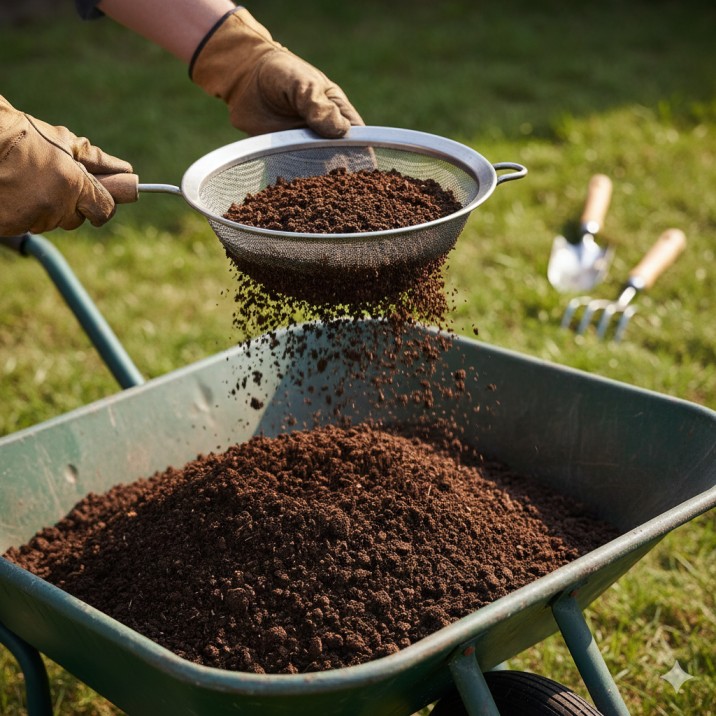
Step 7: Harvest Your “Black Gold” and Feed Your Garden
The moment of triumph. Your compost is ready when it’s dark, crumbly, and smells like fresh earth (3-6 months for a cold pile, faster for a hot pile or tumbler).
How to Harvest:
- From a single bin: Stop adding new material for a few weeks. The finished compost will be at the bottom. Use the lower door or scoop it out.
- From a tumbler: Empty contents onto a tarp, sift out finished compost, and return any chunks to restart.
- From a worm farm: Follow the migration method outlined in our worm farm guide.
Using Your Compost:
- Soil Amendment: Mix a 3-5cm layer into garden beds before planting.
- Top Dressing: Sprinkle around established plants as a nutrient boost.
- Potting Mix: Create a super-powered mix with 1 part compost, 1 part coconut coir, 1 part perlite.
- Lawn Care: Sieve finely and spread a thin layer over your lawn in spring or autumn.
This nutrient-rich resource is the perfect partner for a resilient garden. To see what thrives when fed with such rich, living soil, explore our guide to the best native plants for a sustainable Aussie backyard.
Composting Kitchen Waste Australia: Your Essential FAQs
Q: Will a compost bin smell bad and attract pests?
A: A properly balanced compost bin (with the right 1:1 greens:browns ratio) should have a pleasant, earthy smell. Bad odors and pests are signs of an imbalance—usually too many kitchen scraps without enough browns. A secure lid also prevents animal pests.
Q: I live in an apartment. Can I really compost?
A: Absolutely! A worm farm or Bokashi bucket are specifically designed for small, indoor spaces. They are odorless, compact, and incredibly effective. They are the ideal solution for composting kitchen waste Australia in an urban setting.
Q: Can I compost citrus, onions, and garlic?
A: Yes, but in moderation. These materials are acidic and can slow down microbial activity if added in large volumes. Chop them up and mix them well with plenty of “browns.” In a worm farm, use them very sparingly, as worms are sensitive to acidity.
Q: How often should I turn my compost pile?
A: For a standard backyard bin, turning it once every 1-2 weeks is ideal. This adds oxygen and speeds up decomposition. If you’re using a tumbler, a few spins every 2-3 days is perfect. More turning = faster compost.
Q: What’s the difference between compost and fertilizer?
A: This is crucial. Fertilizer (synthetic or organic) is like a vitamin pill, it feeds the plant directly. Compost is like a soil probiotic, it feeds the soil ecosystem (worms, microbes, fungi), which in turn creates healthy soil that naturally nourishes plants. Compost builds long-term soil health; fertilizer provides a short-term nutrient boost.
Your Action Plan: Start This Weekend
- Today: Find a container for your kitchen bench. Start saving your fruit and veggie scraps.
- This Week: Research which outdoor system (Bin, Worm Farm, Bokashi) suits your space. Check your council’s website for discounted bins.
- This Weekend: Set up your system. Build your first “compost lasagne” layer.
- Next Month: Establish your weekly turn/check routine. Observe and learn.
Composting kitchen waste Australia is a journey, not a destination. Start small, be patient, and let nature do most of the work. That “waste” in your kitchen is the beginning of your garden’s brightest future.
2 thoughts on “The Ultimate 7-Step Guide to Composting Kitchen Waste Australia”