Imagine standing in your backyard, holding a handful of soil so rich and alive it feels like magic. This dark, crumbly “black gold” didn’t come from a bag at the hardware store. You made it. From your morning coffee grounds, last night’s potato peels, and those dry leaves you raked up last autumn.
This isn’t a fantasy, it’s the promise of following a true Australian Composting Guide. And here in Australia, where our soils can be tough and our weather tougher, mastering this skill isn’t just gardening. It’s an act of resilience.
I remember my first compost heap. It was a sad, soggy mound in the corner that smelled faintly of failure. I was following generic advice from overseas that didn’t account for our blistering sun or heavy clay. It took years of learning—through trial, error, and conversations with local gardeners, to understand that composting in Australia has its own unique rhythm. It’s about working with our environment, not against a rulebook written for a different climate.
This Australian Composting Guide is the handbook I wish I’d had. We won’t just cover the basics; we’ll dive deep into the science of soil, troubleshoot common Aussie problems, and build a system that fits your life, whether you’re on a quarter-acre block in Perth or in a Melbourne apartment. By the end, you’ll see your kitchen scraps not as waste, but as the most valuable resource your garden will ever receive.
Table of Contents
Why This Australian Composting Guide is Different: It’s Built for Our Land
Let’s be clear: composting anywhere is good. But composting specifically for Australian conditions is transformative. Our challenges are unique, and so are our solutions.
The Australian Soil Reality: Ancient and Thirsty
Much of Australia’s soil is geologically ancient, heavily weathered, and often low in organic matter. It tends to extremes: it’s either sandy and drains faster than you can water it, or it’s heavy clay that bakes hard in summer. This isn’t bad soil; it’s just hungry soil. It craves the organic matter and microbial life that compost provides. Adding compost is like giving a sponge to sandy soil and opening airways in clay. It’s the single most effective way to build resilience against drought, a critical skill as our summers grow hotter and longer.
The Waste Paradox: Burying Resources While Buying Fertility
Nationally, we face a staggering contradiction. Australian households send millions of tonnes of organic waste to landfill each year, where it decomposes without oxygen and produces methane, a potent greenhouse gas. Simultaneously, we spend millions at garden centres buying bagged soil improvers and fertilisers, often shipped from interstate or overseas.
Following this Australian Composting Guide breaks this illogical cycle. You become a local loop, transforming your household’s “waste” into hyper-local fertility. According to Planet Ark’s National Recycling Week reports, home composting can divert over 300kg of organic waste per household annually from landfill. That’s a direct, personal cut to your carbon footprint and a giant leap towards a Sustainable Aussie Backyard.
The 10-Step Framework of This Australian Composting Guide
This Australian Composting Guide is built as a sequential framework. You can think of it as a pyramid: start with the foundation (your mindset and tools), build the structure (your pile), and then master the refinements (troubleshooting and advanced techniques).
Step 1: The Foundational Mindset – Seeing Your Home as an Ecosystem
Before you buy a single bin, make this mental shift: Your home is not a linear system (buy → consume → discard). It can be a circular ecosystem.
Look at the components:
- Input: Kitchen scraps, garden prunings, paper waste.
- Process: Composting (nature’s recycling).
- Output: Nutrient-rich humus.
- Result: Healthier plants, more food, better soil, less waste.
Your goal is to connect these dots. Start by simply observing what you throw away for a week. That audit is the first, most powerful step in this Australian Composting Guide.
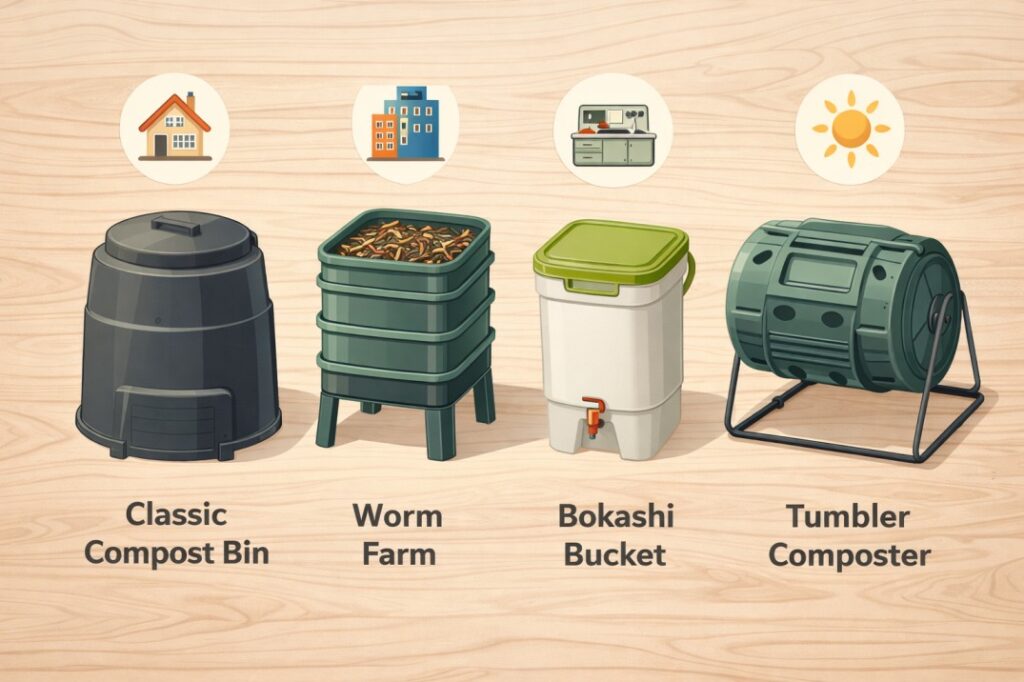
Step 2: Selecting Your System – The Tool for Your Context
This is your most important practical decision. The right system makes the process easy; the wrong one makes it a chore.
For the Dedicated Gardener with Space: The Stationary Bay or Bin
This is the classic method and the backbone of many a successful garden. It’s ideal for handling large volumes of garden waste (lawn clippings, prunings) alongside kitchen scraps.
- Pros: Large capacity, low cost (often <$50 from councils), works passively.
- Cons: Slower (3-9 months), requires outdoor space, needs occasional turning.
- Best for: The patient gardener with a mixed waste stream. It’s the system we often assume when we talk about backyard composting Australia.
For the Urban Dweller or Family: The Worm Farm (Vermicomposting)
If space is limited, worms are your best friends. A compact, multi-tray worm farm can sit on a balcony, patio, or even in a garage.
- Pros: Odourless, fast for kitchen scraps, produces both solid castings and liquid fertiliser (“worm tea”), great for kids to learn from.
- Cons: Sensitive to extreme heat/cold, cannot process large volumes of garden waste, requires specific food (no citrus/onions in excess).
- Best for: Apartments, small courtyards, and families. It’s such a vital method that we created a dedicated worm farm for beginners Australia guide.
For the Speed-Obsessed or Pest-Conscious: The Tumbling Composter
A sealed barrel on a frame that you spin to aerate. It accelerates decomposition dramatically.
- Pros: Very fast (compost in 4-8 weeks), excellent aeration, fully pest-proof, easy to turn.
- Cons: Higher upfront cost, smaller capacity, needs a balanced “recipe” from the start.
- Best for: Those who want quick results and have a manageable amount of scraps. It’s a top contender when searching for the best compost bin Australia has for sale.
For the Zero-Waste Enthusiast or Apartment: The Bokashi Bucket
A Japanese method using anaerobic fermentation with a special bran. It’s unique because it can process all food waste, including meat, dairy, and small bones.
- Pros: Can compost everything, odourless when sealed, very fast (ferments in 2 weeks), compact.
- Cons: Produces a “pre-compost” that needs to be buried in soil or added to another compost system to finish, requires ongoing purchase of Bokashi bran.
- Best for: Those committed to zero food waste, people with no outdoor space (you can bury the fermented waste in a community garden pot).
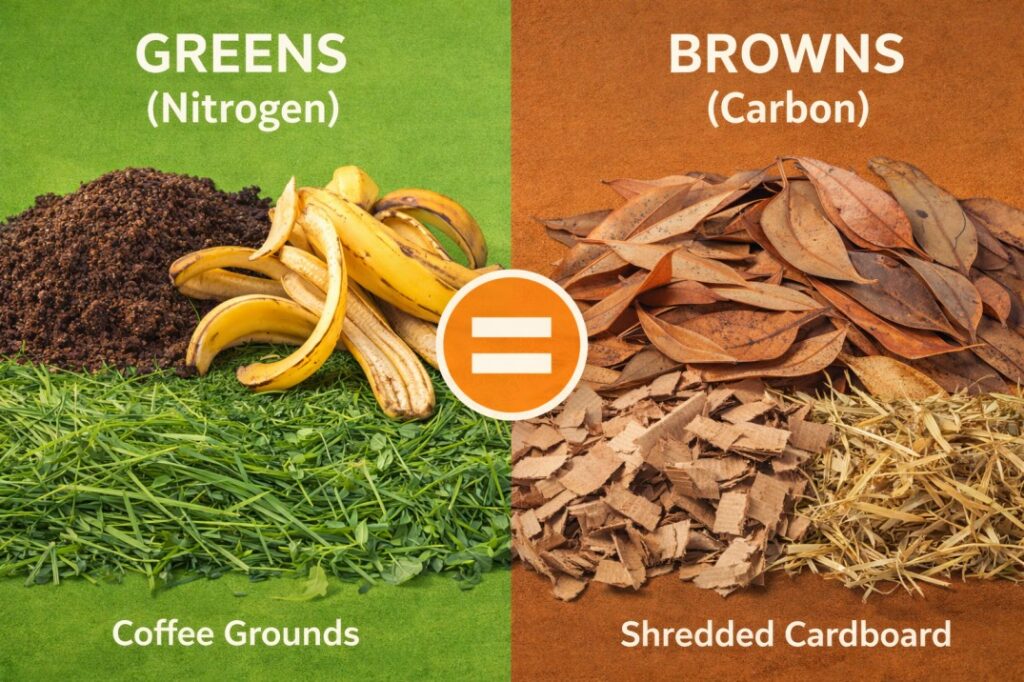
Step 3: Mastering the Ingredients – The Greens & Browns Lexicon
Every expert Australian Composting Guide hinges on this balance. It’s not a suggestion; it’s the law of decomposition.
Greens (Nitrogen-Rich, ~20-30 parts Carbon to 1 part Nitrogen):
These are the “activators.” They are typically moist, colourful, and provide the protein for decomposing microbes to multiply rapidly. Think of them as the engine fuel.
- Fresh Kitchen Waste: Vegetable & fruit scraps, coffee grounds, tea leaves/bags (staples removed).
- Fresh Garden Waste: Lawn clippings, green leafy prunings, annual weeds (before they seed!).
- Other: Manure from herbivores (chickens, cows, horses) – a potent “green.”
Browns (Carbon-Rich, ~50-100+ parts Carbon to 1 part Nitrogen):
These are the “bulking agents.” They are typically dry, brown, and woody. They provide energy (carbon), create essential air pockets, and prevent the pile from becoming a dense, smelly sludge. Think of them as the engine’s structure and air intake.
- Dry Garden Matter: Autumn leaves (gold!), straw, hay, untreated wood chips, dry pine needles.
- Processed Carbon: Shredded cardboard (egg cartons, pizza boxes sans grease), shredded newspaper (non-glossy), paper towel rolls.
- Natural Fibres: 100% cotton or wool scraps (cut small), dry bracken fern.
The Golden Ratio: Aim for a 50/50 mix by VOLUME, not weight. A simple rule from this Australian Composting Guide: for every ice cream container of kitchen scraps (greens), add an ice cream container of shredded cardboard or dry leaves (browns). If in doubt, add more browns.
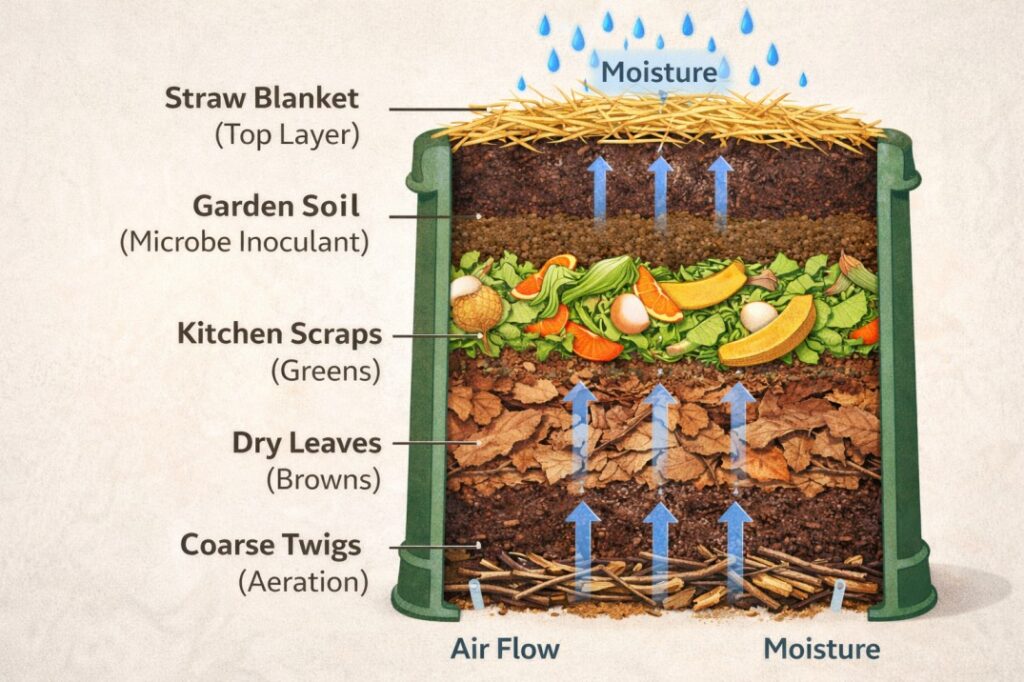
Step 4: The Art of the Build – Constructing Your “Compost Lasagne”
A haphazard pile works eventually, but a carefully built one works faster and without issues. Here is the construction method I’ve refined over years:
- The Foundation (Layer 1 – Drainage & Aeration): Place your bin on bare soil if possible. Start with a 15cm layer of coarse, woody material—twigs, small branches, or even crumpled cardboard strips. This is critical for airflow from the bottom and prevents waterlogging.
- The Carbon Base (Layer 2): Add a 10-15cm layer of your bulkiest browns—straw or dry leaves are perfect. This soaks up any excess moisture from above.
- The First Nitrogen Hit (Layer 3): Add a 5-10cm layer of your mixed kitchen scraps and green garden waste.
- The Microbial Inoculant (Layer 4 – The Secret Starter): Sprinkle a thin layer (a handful or two) of garden soil, finished compost, or even a commercial compost starter. This introduces the billions of bacteria and fungi that will do the work. It’s like adding sourdough starter to bread.
- The Moisture Check: Lightly water this lasagne until it has the consistency of a damp, wrung-out sponge. Not dripping, not dusty.
- Repeat: Continue the pattern: Browns → Greens → Soil → Moisture. Each “set” of layers should be 15-25cm thick.
- The Final Blanket: Always, always cap your pile with a thick 5-10cm layer of browns (straw is ideal). This final blanket retains moisture, suppresses odours and flies, and insulates the pile.
This methodical build is the surest path to success outlined in any legitimate Australian Composting Guide. For a laser focus on just the food waste component, our guide on composting kitchen waste Australia offers a perfect deep dive.
Step 5: The Science of Maintenance – Feeding the Microbial City
Your compost pile is a bustling, microscopic city. Your job as mayor is to provide good living conditions: food, water, and air.
Aeration (The “Turning” Schedule):
Oxygen is non-negotiable for the fast-acting, sweet-smelling aerobic bacteria we want. Without it, anaerobic bacteria take over, causing foul smells.
- For a hot, fast pile: Turn every 3-5 days with a garden fork or compost aerator tool. Move the outer, cooler material to the hot centre.
- For a slower, cold pile: Turning once every 2-4 weeks is sufficient.
- Sign it needs air: A rotten, sulphurous smell is a cry for help. Turn it immediately.
Moisture (The Squeeze Test):
The microbial workforce needs water to live and move, but too much drowns them.
- The Test: Grab a handful of material from 15cm deep. Squeeze it firmly.
- Perfect: 1-2 drops of water appear. It holds its shape briefly before crumbling.
- Too Wet: Water streams out. Remedy: Turn in copious dry browns (shredded cardboard is a super-absorber).
- Too Dry: It crumbles immediately with no moisture. Remedy: Water lightly as you turn the pile.
Temperature – The Gauge of Activity:
A hot pile (55-65°C) is a happy, fast-working pile that kills weed seeds and pathogens.
- Check it: Stick your hand in. It should feel unmistakably warm to hot. A compost thermometer removes guesswork.
- If it’s cold: The pile may be too small, too dry, or lack nitrogen (greens). Add a concentrated green like fresh grass clippings, give it a drink, and turn it.
Step 6: Advanced Australian Composting Guide Techniques
Once you’ve mastered the basic lasagne, you can explore methods to optimise for speed, volume, or specific materials.
Hot Composting: This is the intensive method. The goal is to maintain a core temperature of 55-65°C for several days. To achieve this:
- Build a large pile all at once (at least 1m x 1m x 1m).
- Use a perfect 50/50 mix of shredded greens and browns.
- Turn it every 2-3 days to re-inject oxygen.
- Monitor moisture closely. You can have finished compost in 18-30 days.
Cold Composting (The “Add-As-You-Go” Pile): This is the low-effort method. You simply add materials to the top of your bin as you generate them, trying to keep a rough balance. It’s slower (6-12 months) but perfect for the casual gardener. Most of our advice on backyard composting Australia naturally leans towards this sustainable, steady approach.
Composting Grass Clippings: A common Australian dilemma. Never add a thick layer of fresh grass clippings alone, they will form an impenetrable, slimy, anaerobic mat. Always mix them thoroughly with an even larger volume of browns (e.g., one bucket of grass to two buckets of shredded leaves).
Step 7: Climate-Specific Wisdom from This Australian Composting Guide
Our continent’s diversity demands localised strategies.
For Arid & Semi-Arid Zones (WA, SA, NT interior):
- Sun Shield: Place your bin in the coolest, shadiest spot you can find—under a deciduous tree or a shade cloth structure.
- Water Wisdom: In water-restricted areas, use “greywater” from rinsing vegetables or leftover drinking water to moisten the pile. A thick layer of straw on top is essential to reduce evaporation.
- Browns are King: Stockpile autumn leaves and cardboard. You’ll need them to balance the drier organic matter.
For Humid Subtropical & Tropical Zones (QLD, Northern NSW):
- Drainage is Everything: Elevate your bin on bricks or use a tumbler to avoid waterlogging during wet season deluges.
- Fight the Sog: You will need a much higher ratio of browns to counteract the high humidity and moisture in green waste.
- Aerate Relentlessly: Turn your pile more frequently to prevent anaerobic conditions in the sticky heat.
For Temperate Zones (VIC, TAS, Southern NSW, ACT):
- Winter Insulation: Wrap bins in old carpet, bubble wrap, or surround them with bales of straw in winter to retain microbial heat.
- Summer Moisture: Don’t let your pile dry out completely during hot, dry spells. The “squeeze test” is your weekly ritual.
- Leverage Seasons: Autumn is for collecting leaves (browns). Spring and summer are for generating grass and garden waste (greens).
Step 8: The Diagnostic Clinic – Troubleshooting with an Australian Eye
Even the best-laid piles hiccup. Here’s how to diagnose and cure common Australian ailments.
- Symptom: Pile is damp, sweet-smelling but not heating up.
- Diagnosis: Too small, or needs more nitrogen.
- Cure: Add more material to reach 1 cubic metre. Add a nitrogen-rich activator like fresh manure, blood and bone, or a large load of grass clippings.
- Symptom: Pile smells like ammonia.
- Diagnosis: Too much nitrogen (greens), not enough carbon.
- Cure: Immediately turn in a large quantity of dry browns (shredded cardboard is perfect here).
- Symptom: Ants have moved in.
- Diagnosis: Pile is too dry.
- Cure: Moisten the pile thoroughly and turn it. Ants prefer dry, stable condos, not damp, turned apartments.
- Symptom: Pile is attractive to rodents or possums.
- Diagnosis: You are likely composting forbidden items (meat, dairy, oily food) or the bin isn’t secure.
- Cure: Use a rodent-proof bin with a tight lid and a fine wire mesh base. Stick to plant-based scraps. For everything else, consider a sealed Bokashi system.
For a more extensive list of problems, the Royal Botanic Gardens Victoria offers excellent, science-backed advice on their gardening pages.
Step 9: Harvesting – Recognising and Collecting “Black Gold”
Your patience pays off. Finished compost is:
- Dark and crumbly, like a rich chocolate cake.
- Sweet-smelling, with a deep, earthy aroma.
- Cool to the touch (microbial activity has finished).
- Unrecognisable from its original ingredients (you might see an occasional eggshell or twig).
How to Harvest Without Disrupting the System:
- The Bottom-Drawer Method (for single bins): Stop adding to the bin for 4-6 weeks. The finished compost will settle at the bottom. Use the lower door or gently scoop it out from the base.
- The Migration Method (for multi-tray systems like worm farms): Add a new tray of fresh food and bedding on top. The worms will migrate upwards, leaving the finished castings in the bottom tray for easy harvest.
Step 10: Utilisation – Putting Your Compost to Work
This is the glorious finale of your Australian Composting Guide journey. Your homemade compost is superior to any store-bought product because it’s alive and tailored to your local environment.
As a Soil Amendment:
- For new beds: Before planting, spread a 5-8cm layer over the soil and dig it in to a depth of 15-20cm.
- For existing gardens: As a top-dressing each spring and autumn, apply a 2-3cm layer around plants and let the worms and water incorporate it.
As a Potting Mix:
Create a vibrant, living potting mix: 1 part compost, 1 part coarse sand or perlite (for drainage), and 1 part coconut coir (for moisture retention).
As Lawn Food:
Sieve compost to a fine texture. Spread a thin (1cm) layer over your lawn in early spring or autumn and gently rake it in. This is known as “top-dressing” and dramatically improves soil health under the turf.
For Seed Starting:
Mix 1 part fine, sieved compost with 2 parts sharp sand or perlite for a nutritious, well-draining seed-raising mix.
The plants that will thank you most are often Australian natives, which evolved in low-fertility soils and thrive on the balanced, non-chemical boost compost provides. Discover the perfect matches in our guide to the best native plants for a sustainable Aussie backyard.
Deep Dive: The Soil Food Web – Why Compost is Alive
To truly appreciate compost, you need to understand what it is. It’s not just “rotted plants.” It’s the cornerstone of the soil food web a complex, symbiotic ecosystem.
When you add finished compost to your soil, you’re introducing:
- Bacteria & Fungi: The primary decomposers. They break down organic matter into nutrients plants can absorb and create glues that bind soil particles into healthy aggregates.
- Protozoa & Nematodes: The micropredators. They eat bacteria and fungi, releasing their stored nutrients in plant-available forms (a process called “mineralisation”).
- Earthworms & Arthropods: The macro-engineers. They physically tunnel through soil, creating channels for air, water, and roots. Their castings are pure, concentrated fertility.
This living network is what makes compost a soil conditioner, not just a fertiliser. It builds structure, water-holding capacity, and natural disease suppression. It’s the difference between giving your plant a fish (synthetic fertiliser) and teaching it to fish (building a healthy soil ecosystem).
Your Composting Journey Awaits
This Australian Composting Guide has armed you with the principles, techniques, and local knowledge to succeed. Remember, the perfect compost pile is a myth. Every gardener’s heap is a unique experiment, a conversation with their own household and local climate.
Start small. Be consistent. Observe and adapt. That soggy pile or curious possum isn’t a failure; it’s data. Use it to learn.
The final step is yours to take. Get that container for your kitchen bench. Feel the satisfaction of your first layered “lasagne.” Smell that first batch of finished, earthy compost. There is no going back. You’ll have transformed not just your waste and your soil, but your entire relationship with the piece of earth you call your garden.
Welcome to the cycle.
4 thoughts on “The Ultimate 10-Step Australian Composting Guide: From Kitchen Scraps to Garden Gold”