
Saving seeds Australia is the single most empowering skill a gardener can learn. It transforms you from a consumer who buys plants each season into a creator who sustains your own garden year after year. It’s gardening freedom, pure and simple.
G’day, I’m Sarah. I still remember the first time I successfully saved tomato seeds from a beautiful heirloom variety. I dried them, stored them over winter, and planted them the following spring. Watching those seedlings emerge felt like magic, but it wasn’t. It was simply working with nature’s own system.
This guide will take you from absolute beginner to confident seed saver. We’ll cover the simple science, the step-by-step techniques for different vegetables, and the Australian-specific considerations that will help you succeed in our unique climate. No fluff, just practical, hands-on knowledge.
Table of Contents
Why Saving Seeds Matters More Than Ever
Saving seeds Australia isn’t just a nostalgic practice. It’s a forward-thinking, resilient approach to gardening that delivers real, tangible benefits.
It Saves You Money: A single packet of seeds costs several dollars. A single plant produces hundreds or thousands of seeds. The math is simple. One tomato can give you enough seeds for a decade of growing.
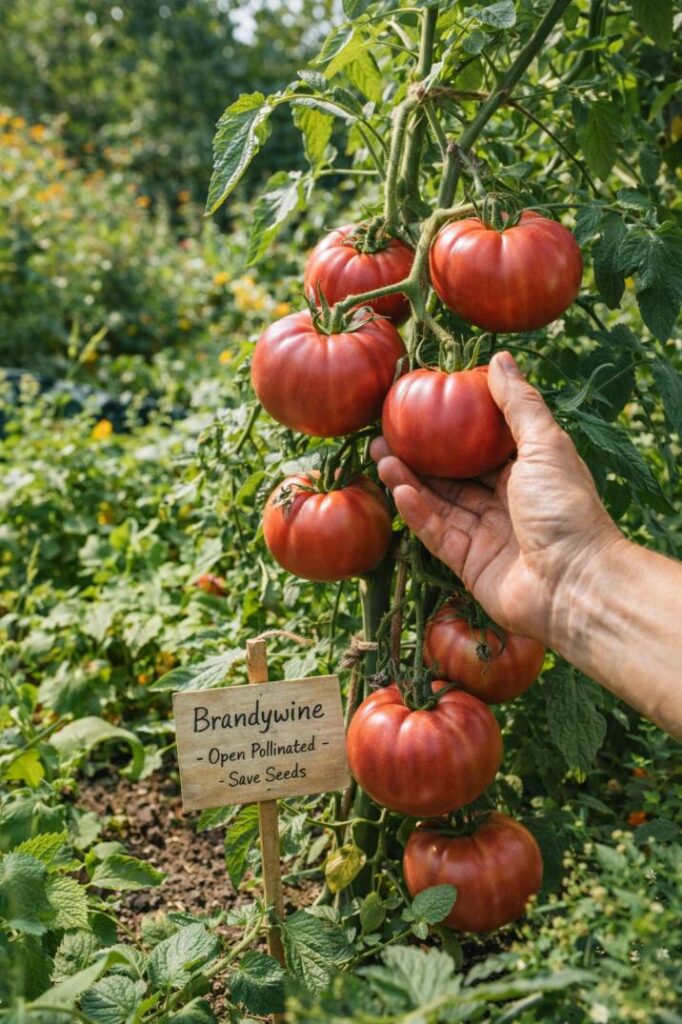
It Adapts to Your Garden: This is the secret superpower of open pollinated seeds. When you save seed from your strongest, most productive, best-tasting plant, you’re selecting for those traits. Over several seasons, your saved seeds become perfectly adapted to your specific soil, your microclimate, and your gardening style. You’re essentially breeding your own custom variety.
It Preserves Biodiversity: Commercial seed catalogues offer fewer and fewer varieties. By saving heritage and heirloom seeds, you’re helping preserve genetic diversity that might otherwise be lost forever.
It Makes You Self-Sufficient: Seed independence means you’re never caught out by supply chain issues, sold-out catalogues, or shipping delays. Your garden becomes a closed loop.
The Golden Rule: Know Your Seed Types
Before you collect a single seed, you need to understand one absolutely critical distinction. It determines success or failure.
| Seed Type | What It Means | Can You Save It? | Example |
|---|---|---|---|
| Open Pollinated | Pollinated naturally by insects, wind, or self. Breed true to type. | YES. Absolutely. | Heirloom tomatoes, most beans, lettuce, peas, coriander. |
| Hybrid (F1) | Deliberately cross-pollinated by breeders for specific traits. | NOT recommended. Seeds produce unpredictable, often inferior plants. | Many supermarket tomatoes, modern sweet corn hybrids. |
| GMO | Genetically engineered. | Not available to home gardeners in Australia. | N/A |
The takeaway: Only save seeds from open pollinated varieties. If you buy seedlings or seed packets, look for labels that say “heirloom,” “heritage,” or “open pollinated.” If you’re unsure, ask at your local nursery.
Step 1: Choosing the Right Plants for Seed Saving
Not every plant in your garden is a good candidate. Here’s how to select your seed parents.
Choose Your Healthiest, Strongest Plants. Look for:
- Vigorous growth and disease resistance.
- Abundant yields.
- The best flavour (for edibles).
- The most beautiful flowers (for ornamentals).
Choose Open Pollinated Varieties. As above, this is non-negotiable.
Avoid Cross-Pollination Issues. This is where beginners often stumble. Some plants happily pollinate themselves and stay true. Others enthusiastically swap pollen with their neighbours. Know which is which:
| Self-Pollinating (Safe for Beginners) | Cross-Pollinating (Needs Isolation) |
|---|---|
| Tomatoes | Corn |
| Lettuce | Pumpkins, Zucchinis |
| Peas, Beans | Cucumbers |
| Chillies, Capsicums | Melons |
| Eggplant | Brassicas (broccoli, cabbage, cauliflower) |
If you want to save seeds from cross-pollinating crops, you’ll need to either:
- Isolate plants by distance (hundreds of metres, often impractical in suburbia).
- Use physical barriers like fine mesh bags over flowers.
- Hand-pollinate flowers yourself and bag them.
For beginners, start with self-pollinators. Tomatoes, beans, lettuce, and peas are perfect first projects.
Step 2: Harvesting Seeds at the Right Time
Timing is everything. Harvest too early, and the seeds aren’t mature. Harvest too late, and they’ve already dropped or rotted.
For Wet-Fruited Vegetables (Tomatoes, Cucumbers, Pumpkins, Capsicums)
The seed is mature when the fruit is fully ripe—often over-ripe for eating. A tomato you’d happily slice for a sandwich is perfect for seed saving. A pumpkin left on the vine until the stem starts cracking is ideal.
For Dry-Fruited Vegetables (Beans, Peas, Lettuce, Coriander, Carrots, Onions)
Leave the pods or seed heads on the plant until they are completely dry and brown. For beans and peas, the pods should be brittle and the seeds inside hard. For lettuce and coriander, wait until the fluffy seed heads are dry.
Australian Climate Note: In humid subtropical and tropical areas (QLD, Northern NSW), it can be challenging to dry seeds on the plant without them rotting. You may need to harvest seed heads slightly early and bring them indoors to finish drying in a warm, airy spot.
Step 3: Extracting and Cleaning Seeds
Different seeds need different processing methods. Here are the two main techniques.
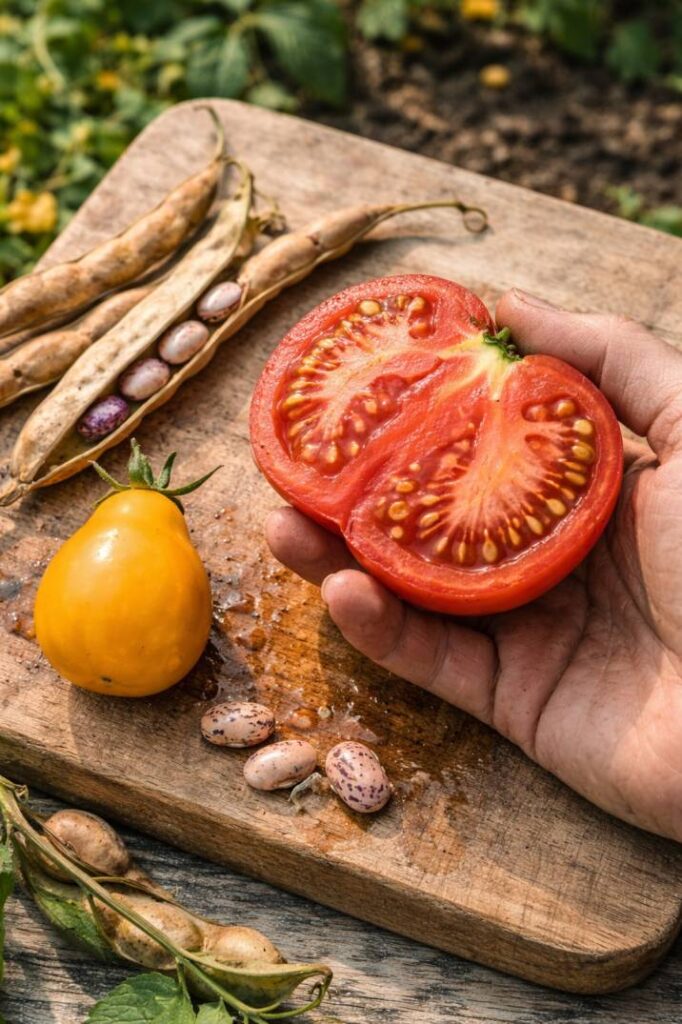
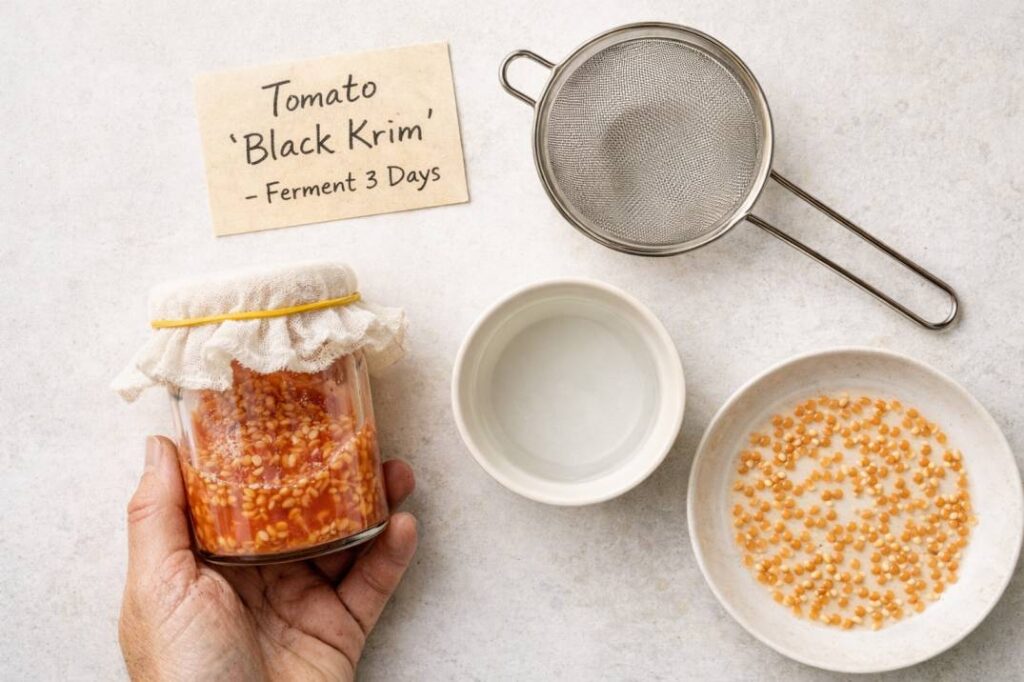
The Wet Method (For Tomatoes and Cucumbers)
This is the most common question I get: how to save tomato seeds properly.
- Scoop: Cut your ripe tomato and squeeze the jelly-like pulp and seeds into a clean jar.
- Ferment: Add a splash of water, cover the jar with a cloth or paper towel secured with a rubber band, and leave it at room temperature for 2-4 days. You’ll see a layer of white mould form on top. This is good! The fermentation process breaks down the gelatinous coating that inhibits germination and mimics the natural rotting process.
- Rinse: Remove the mould, add water, swirl vigorously, and pour off the liquid. Good seeds sink. Bad seeds and debris float. Repeat until only clean seeds remain.
- Dry: Spread seeds on a coffee filter, glass dish, or ceramic plate. Never dry on paper towels, the seeds will stick permanently. Label them immediately.
Pro Tip: Fermentation smells. It’s normal. Just don’t seal the jar tightly, or it might burst.
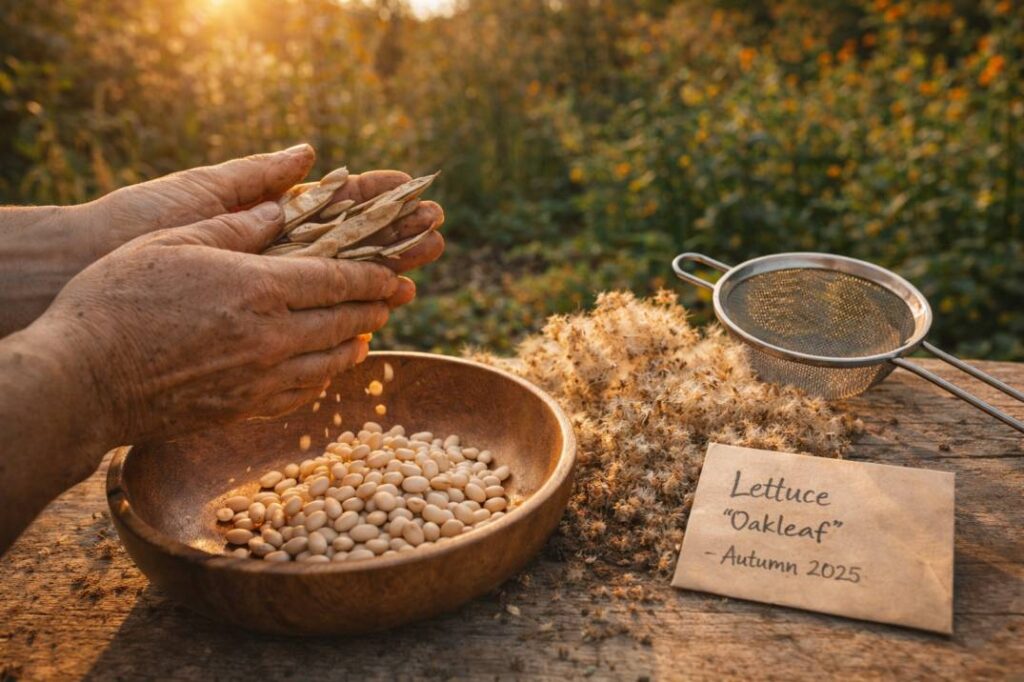
The Dry Method (For Beans, Peas, Lettuce, Coriander, Flowers)
- Shell: Remove seeds from dry pods or rub seed heads between your hands over a bowl.
- Winnow: Gently blow away the lighter chaff, or use a fine mesh sieve to separate seeds from debris.
- Dry further: Spread seeds in a single layer on a plate or tray and leave in a warm, dry, airy spot for another 1-2 weeks. They must be completely dry before storage.
Step 4: Seed Storage Australia – Keeping Your Seeds Viable
You’ve done the hard work. Now don’t waste it with poor storage. Seed storage Australia requires attention to our heat and humidity.
The Three Enemies of Seed Viability:
- Heat: Accelerates aging.
- Moisture: Causes mould or premature sprouting.
- Light: Can damage embryos over time.
The Perfect Storage Method:
- Containers: Use paper envelopes (labelled!) inside an airtight container like a glass jar with a rubber seal or a quality snap-lock plastic box.
- Cool: Store in the coolest part of your house, not the garden shed, which bakes in summer. A cupboard in an air-conditioned room is perfect. The fridge is excellent for long-term storage, but ensure seeds are bone-dry first.
- Dark: Keep them in a dark cupboard or drawer.
- Silica Gel: In humid climates, add a silica gel sachet or a teaspoon of dry rice wrapped in tissue inside the jar to absorb excess moisture.
How Long Do Seeds Last?
| Seed Type | Typical Viability (Cool, Dry Storage) |
|---|---|
| Onions, Parsnips | 1 year |
| Corn, Capsicum | 2 years |
| Beans, Peas, Carrots | 3 years |
| Tomatoes, Brassicas | 4-5 years |
| Cucurbits (Pumpkins, Cucumbers) | 5-6 years |
Always label your envelopes with:
- Seed variety.
- Date harvested.
- Year grown.
Step 5: Testing Germination Before Planting
Before you rely on saved seeds for your main seasonal planting, do a simple germination test.
- Count out 10 seeds.
- Place them on a damp paper towel.
- Fold the towel, place it in a snap-lock bag, and keep it in a warm spot.
- Check after the typical germination period for that crop.
- Calculate the percentage. 70% or higher is excellent and worth planting normally. Lower than 50%, plant more densely or consider buying fresh seed.

Australian Climate Considerations for Seed Saving
Our continent presents unique challenges and opportunities.
Tropical & Subtropical (QLD, NT, Northern NSW):
- High humidity makes drying seeds outdoors risky. Always finish drying indoors with good airflow.
- Store seeds in the fridge with silica gel to combat humidity.
- You can often grow and save seed year-round. Plan your seed saving for the dry season.
Arid & Semi-Arid (SA, WA, Inland NSW):
- Low humidity is excellent for drying and storage.
- Protect drying seeds from extreme heat and direct sun.
- Store in a cool, dark cupboard away from heat.
Temperate (VIC, Southern NSW, SA, TAS, WA):
- You have distinct seasons. Plan seed harvests for late summer and autumn.
- Ensure seeds are completely dry before winter storage.
Common Seed Saving Mistakes (And How to Avoid Them)
- Saving from Hybrids: This is the most common heartbreak. You save seeds from a beautiful tomato, plant them next year, and get small, tough, disappointing fruit. Always check the label.
- Drying Seeds on Paper Towels: They stick. You’ll destroy them trying to peel them off. Use coffee filters, glass, or ceramic.
- Storing Seeds Too Warm: Your garden shed hits 50°C in summer. That’s a seed killer. Bring them inside.
- Forgetting to Label: You will not remember which seed is which next spring. Label immediately, including the date.
- Not Drying Thoroughly: The tiniest amount of moisture left inside a seed packet can ruin the whole lot. When you think they’re dry, give them another week.
- Saving from Diseased Plants: Seeds can carry pathogens. Only save from healthy, vigorous plants.
Your Seed Saving Questions, Answered
Q: I only have a small balcony garden. Can I still save seeds?
A: Absolutely. Many self-pollinating plants like tomatoes, chillies, and lettuce grow beautifully in pots and are perfect for seed saving. A single healthy plant can provide plenty of seeds.
Q: Do I need to treat seeds before planting them?
A: Some seeds benefit from pre-treatment. Sweet peas and some native plants need scarification (scratching the hard coat). Others need stratification (a cold period). But for common veggies like tomatoes, beans, and lettuce, simply plant them in moist seed-raising mix at the right time of year.
Q: Can I save seeds from store-bought fruit and vegetables?
A: Sometimes. If it’s an open pollinated heirloom variety (like many heritage tomatoes), yes. If it’s a hybrid (most supermarket capsicums, cucumbers, rockmelons), the seeds will likely produce inferior fruit. Also, some imported produce may be treated to prevent germination. It’s always better to source seeds from known open pollinated varieties.
Q: How can I connect with other seed savers in Australia?
A: The Seed Savers Foundation is our national network. They have local groups across the country, run seed swaps, and are an incredible resource for beginners. I highly recommend joining.
Q: How does seed saving connect to my broader organic garden?
A: It completes the cycle. You’re building healthy soil with compost, you’re growing strong plants using companion planting to reduce pests, and you’re saving the best of the best to replant. It’s the ultimate expression of a self-sustaining, bee-friendly garden ecosystem.
Conclusion: Your Legacy in a Seed
Saving seeds Australia is an act of hope. It’s a connection to generations of gardeners who came before us and a gift to those who will come after. Every seed you save carries the memory of a summer harvest, the resilience of a plant that thrived in your specific patch of earth, and the potential for countless future gardens.
Start this season. Choose one open pollinated plant, perhaps a beautiful heirloom tomato or a reliable bean variety. Let it fully mature, harvest the seeds, dry them carefully, and store them with love. Next spring, when you plant those seeds and see the first green shoots emerge, you’ll understand the true magic of gardening.
You’re no longer just a gardener. You’re a seed steward.
Ready to build the complete sustainable garden? Learn how to create the perfect environment for your seed-grown plants with our guide to improving your garden soil Australia-wide. And protect your precious seedlings naturally with our complete organic pest control Australia system.
1 thought on “Saving Seeds Australia: The Ultimate 5-Step Guide to Grow Free Food”