
Have you ever dreamed of having the perfect vegetable patch, only to be stopped by that back-breaking clay soil or the endless battle with weeds? I’ve been there. Years ago, staring at my sad, waterlogged garden, I decided to try building my first raised bed. I cobbled it together with some old timber, filled it with whatever soil was cheapest, and crossed my fingers. It worked sort of. But it taught me what really matters.
Today, after building more beds than I can count, I want to share everything I’ve learned. This raised garden beds Australia DIY guide isn’t just about following steps. It’s about understanding why each step matters for our unique climate. It’s about building something that will last for years, save you time, and give you the most delicious harvests you’ve ever tasted.
Let’s walk through the seven essential steps together. I’ll point out the common traps and share the little tricks that make all the difference. By the end, you’ll have the confidence to build a bed that’s not just a box of dirt, but the foundation of your dream garden.
Table of Contents
Why a Raised Bed is Your Smartest Gardening Decision in Australia
Before we pick up a single tool, let’s talk about why a raised garden beds Australia DIY project is such a game changer here. It’s not just a trend; it’s a practical solution to our specific challenges.
- Escape the “Dirt Lottery”: Most Australian backyards have either impenetrable clay that drowns roots in winter, or sand that drains water faster than you can pour it. A raised bed lets you start fresh with the perfect, fluffy, life-filled soil your plants actually want to grow in.
- Master the Water: In our land of droughts and flooding rains, drainage is everything. A raised bed gives you control. No more swampy spinach after a storm. Plus, you can pair it perfectly with smart watering systems.
- Extend Your Growing Season: The soil in a raised bed warms up much faster in spring. This means you can get your tomatoes in earlier and keep harvesting later into autumn. Those extra weeks make all the difference.
- Gardening That Loves You Back: If you’ve ever stood up from weeding with an ache in your back, you’ll appreciate the raised height. You can build them to whatever height works for you even high enough to garden from a stool.
Step 1: The “Measure Twice” Planning Stage
Rushing this step is the biggest mistake you can make. A little planning saves hours of frustration later.
- Chase the Sun, Not the Shade: Spend a weekend morning watching where the light falls. Your bed needs a minimum of 6 hours of direct sun for fruiting veggies. Mark that golden spot with a stick or a garden hose laid in a rectangle.
- The Golden Rule of Width: This is crucial. Never build a bed wider than you can comfortably reach. If you can only access one side, keep it to 80cm wide. If you can walk around it, 1.2 metres is the absolute maximum. You need to be able to reach the centre without straining or stepping on your beautiful soil.
- Length and Height: Length is flexible. 2.4 metres is a great standard length that makes buying timber easy. For height, 30cm is good for greens and herbs. For root veggies like carrots, go for 45cm. If you have back issues or want to use it as a seat edge, 60cm is a game-changer.
For those with very limited space, these principles are the foundation of making the most of what you have, just like in our guide to small backyard gardening ideas Australia.
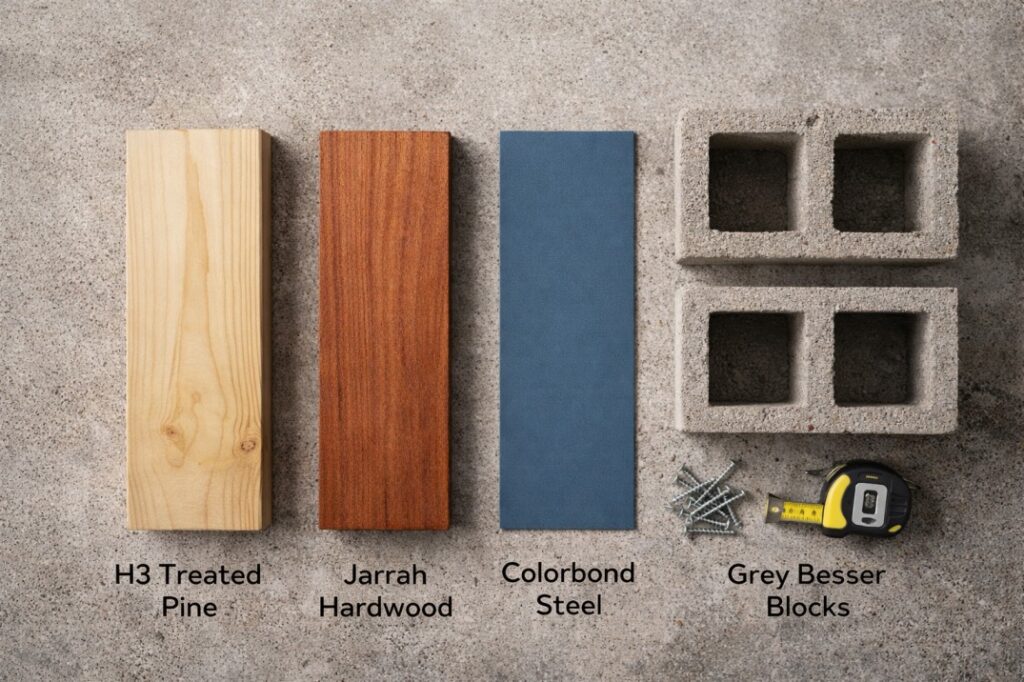
Step 2: Choosing Materials That Last in Our Climate
This is where your raised garden beds Australia DIY project gets its personality and longevity. The wrong choice here can lead to a bed that rots in two years or leaks chemicals into your soil.
Let’s break down the options:
| Material | Pros | Cons | Best For |
|---|---|---|---|
| H3/H4 Treated Pine | Affordable, available, easy to work with. | Concerns about chemical leaching (minimal with modern ACQ). | Beginners, budget projects, temporary beds. Line with plastic if concerned. |
| Hardwood (Jarrah, Ironbark) | Beautiful, natural, lasts 15-20+ years, no chemicals. | Expensive, heavy, hard to cut. | A forever bed, a feature piece, chemical-free gardening. |
| Corrugated Steel (Colorbond) | Ultra-modern look, very long-lasting, no rot. | Can get hot, sharp edges, higher cost. | Contemporary gardens, very long-term solutions. |
| Besser Blocks/Bricks | Permanent, great thermal mass, no maintenance. | Labour-intensive, less flexible, can look harsh. | Ultra-permanent, integrated garden design. |
My recommendation for most first-timers: H3 Treated Pine (200mm x 50mm). It’s the most forgiving material. If you’re worried about the treatment, simply line the inside of the bed with a heavy-duty pond liner or builders’ plastic (poke a few drainage holes at the bottom).
Step 3: The Tool Kit – You Probably Own Most of This
You don’t need fancy gear. Here’s the honest list:
- Tape Measure & Pencil: For marking cuts.
- Hand Saw or Circular Saw: A basic handsaw works fine for pine.
- Drill/Driver: A cordless drill is your best friend. You’ll need a drill bit for pilot holes and a screwdriver bit.
- Spirit Level: A small one (30cm) is perfect.
- Spade & Wheelbarrow: For site prep and moving soil.
- Safety Glasses & Gloves: Non-negotiable.
Step 4: The Build – A Simple, Bulletproof Design
Let’s build a 1.2m x 2.4m bed, 30cm high, from treated pine. This is the classic, sturdy design.
Shopping List:
- 6 x 2.4m lengths of 200mm x 50mm H3 Pine (often called “8×2”).
- 1 box of 100mm galvanised exterior timber screws (bugle head screws are great).
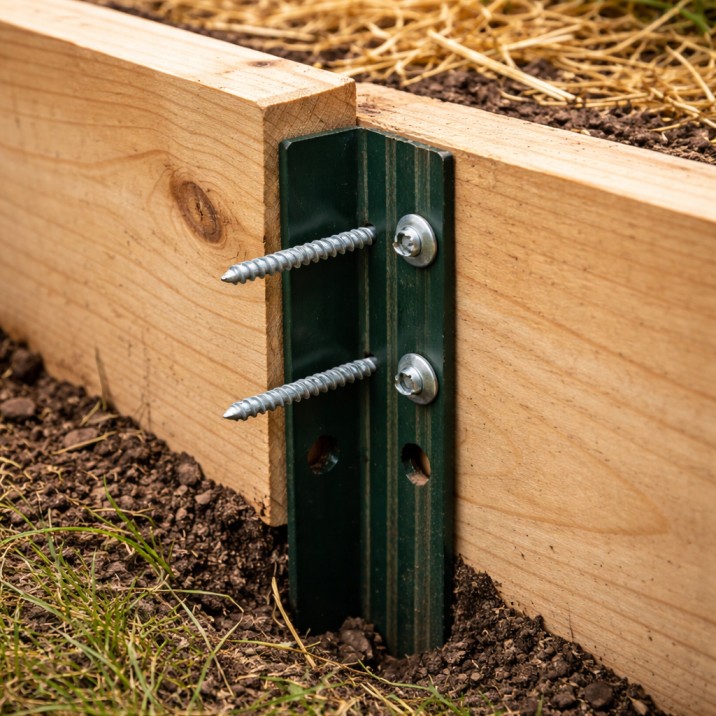
- 4 x 600mm Steel Star Pickets (for corner bracing).
- Optional: Weed mat or cardboard for the base.
The Build, Step-by-Step:
- Cut Your Timber: You’ll use full-length 2.4m pieces for the long sides. From your other pieces, cut 8 x 30cm lengths for the end pieces. (Two layers high = two ends per side x 2 sides = 8 pieces).
- Assemble the First Layer: On a flat surface, lay out two long sides parallel. Slot a 30cm end piece between them at each end to form a rectangle. Pre-drill two holes at each corner to prevent splitting. Screw firmly together. This is your bottom frame.
- Build the Second Layer: Repeat step 2 to make an identical top frame.
- Prepare the Site: Clear all grass and weeds from your marked area. Use your spade to level the ground roughly. You don’t need it perfect, but close helps.
- Place and Stack: Carefully move your bottom frame into position. Place your spirit level on top. If it’s very uneven, you may need to dig out a little soil from the high side. Once level, place the second frame directly on top. Stagger the corners so the vertical seams don’t line up—this makes it much stronger.
- The Crucial Step: Corner Bracing: This stops the bed from bowing outward. Hammer a star picket into the soil at each inside corner, leaving about 15cm exposed above the timber. Drill pilot holes and screw the timber frame securely to each picket with 2-3 screws.
Pro Tip: If your ground is sloped, you can build a “terraced” bed by stepping the frames down the slope. It’s more work but looks fantastic and solves tricky terrain.
Step 5: The Foundation – Drainage and Weed Defence
A great bed needs a great base. This is what separates a good bed from a great one.
- Weed Barrier: Lay down a thick layer of overlapping cardboard (remove any tape) or a commercial weed mat. This smothers any grass or weeds underneath. They will decompose and add to the soil life over time.
- For Epic Drainage (Optional): If you know you have terrible clay subsoil, add a 5-10cm layer of coarse scoria or gravel before your soil mix. This creates a “French drain” at the bottom, ensuring water never pools.
Step 6: The “Secret Sauce” – Mixing Your Ultimate Soil
This is the heart of your raised garden beds Australia DIY success. Don’t just buy the cheapest topsoil. Your plants will live in this. Think of it as investing in your harvest.
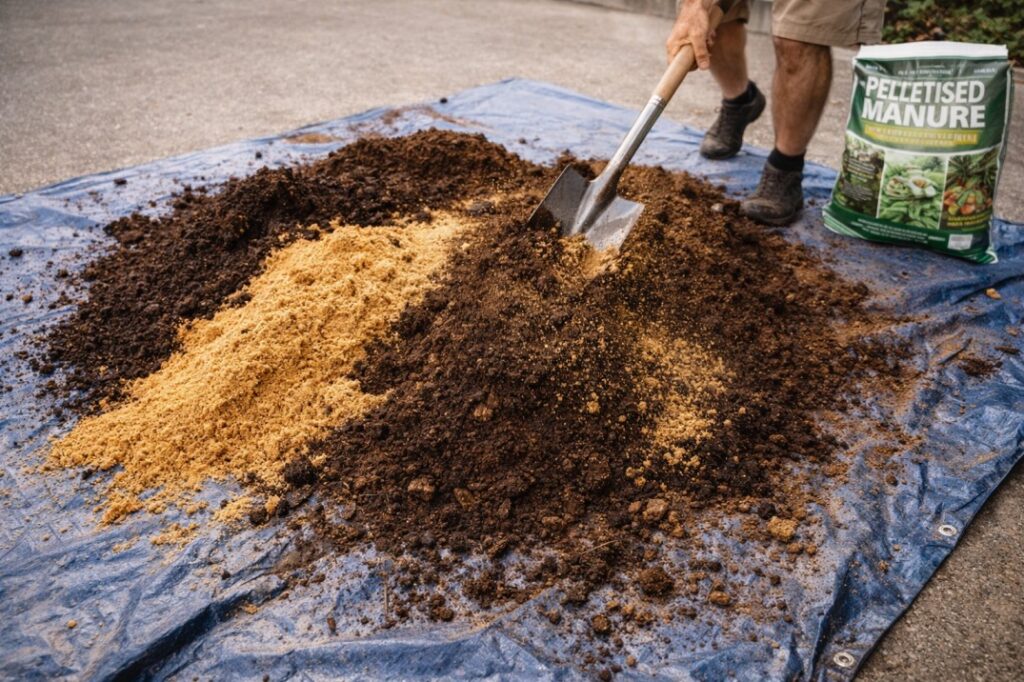
The Perfect Raised Bed Soil Recipe (for a 1.2m x 2.4m x 0.3m bed):
- Base (50%): Premium Vegetable Garden Mix. Buy this in bulk from a landscape supplier. It’s cheaper and better quality than bags.
- Compost & Life (30%): Well-rotted compost or manure. This is the food and the microbial life. If you make your own, even better! Starting a compost system is the perfect partner to this project, as outlined in our compost bin vs worm farm Australia guide.
- Aeration & Drainage (20%): Coarse River Sand or Perlite. This is non-negotiable. It creates air pockets, prevents compaction, and ensures perfect drainage.
- The Boost: Toss in a few handfuls of worm castings and a cup of pelletised chicken manure as a slow-release fertiliser.
Mix all components thoroughly on a tarp before shovelling them into your bed. Fill to within 3-5cm of the top.
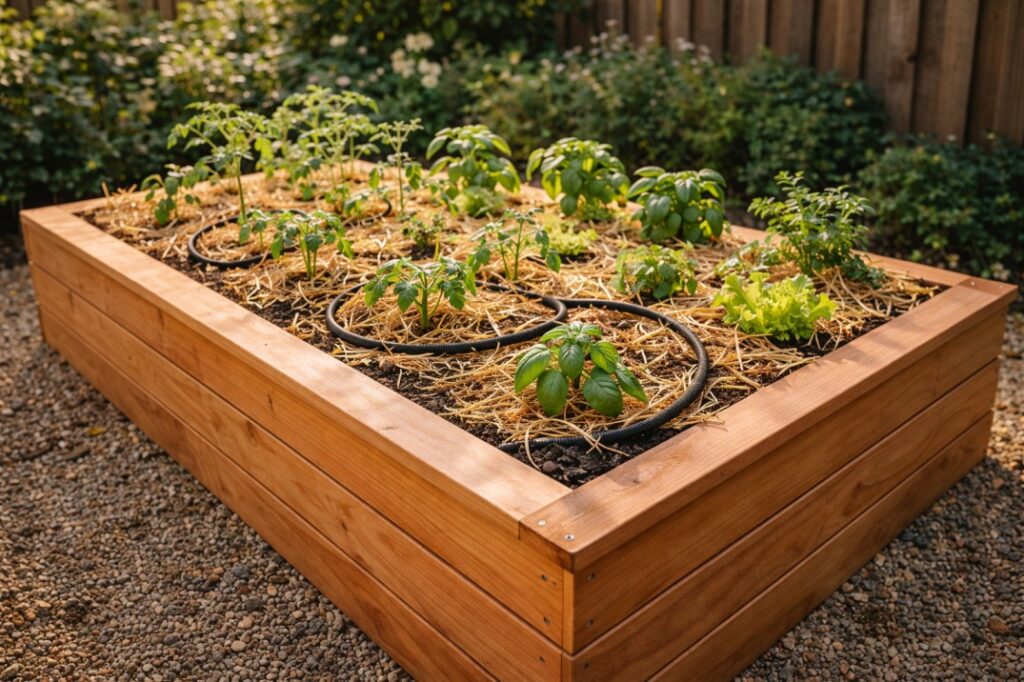
Step 7: Planting, Watering, and The Joy of Harvest
Your bed is built and filled. Now for the magic.
- Let it Settle: Water your new soil mix thoroughly and let it settle for a few days. It will sink a bit top it up if needed.
- Plant Smart: Follow spacing guides. In a raised bed, you can plant a little more densely than in the ground because the soil is so rich. Try “square foot gardening” for maximum yield.
- Water Wisely: Raised beds dry out faster. The best practice is to water deeply and less often. Stick your finger in the soil if it’s dry 3cm down, it’s time for a long, slow soak. This is a core principle of sustainable gardening, detailed in our guide on how to save water in your backyard.
- Mulch Immediately: Once planted, cover every bare bit of soil with a 7cm layer of straw or sugar cane mulch. This locks in moisture, keeps roots cool, and stops weeds.
Troubleshooting Your Raised Bed
- Timber Starting to Rot? This usually happens at the soil line. You can often sister on a new piece of timber alongside the rotten one, or rebuild just that section.
- Soil Level Dropping? This is normal! Organic matter breaks down. Just top it up each season with a fresh compost/soil mix.
- Plants Not Thriving? Check your soil isn’t waterlogged (add more sand) or too dry (check mulch). A simple soil test kit can check pH.
The Real Reward of a DIY Bed
Building a raised garden beds Australia DIY project gives you more than vegetables. It gives you pride. It’s the satisfaction of eating a salad grown in soil you mixed, in a bed you built with your own hands.
It connects you to your food and your space in a way nothing else can. You’ll notice the first ladybird on your beans, the way the morning sun hits the dew on your lettuce.
Start with one bed. Keep it simple. Learn as you go. Next year, you’ll be building your second one twice as fast, and maybe adding a trellis or an irrigation system. Your garden journey starts with that first cut of timber. So, what are you waiting for? Let’s build something great.
3 thoughts on “7 Essential Steps for Your Perfect Raised Garden Beds Australia DIY Project”