Let’s talk about what happens when you water your garden with a hose or sprinkler. You stand there, watching. You see water spray on leaves. You see it pool on hard soil and run off. You see it evaporate in the sun. It feels wasteful, doesn’t it? I used to watch that happen and wish for a better way. That wish led me to install my first drip irrigation system Australia backyard style, and it changed everything.
A drip irrigation system Australia backyard setup sounds technical, but it’s just common sense. It’s about delivering water slowly, directly to the roots where plants actually need it. No waste. No fuss. This guide walks you through seven clear steps. We’ll cover planning, buying the right parts, and installing it yourself. By the end, you’ll know how to build a system that saves you hours of watering and keeps your garden perfectly hydrated.
Table of Contents
Why Drip Irrigation is a Game-Changer for Australian Gardens
Before we look at the parts, let’s understand why this is worth your time. Our climate makes efficient watering non-negotiable.
- Saves a Staggering Amount of Water: According to Irrigation Australia, drip systems can be up to 90% more efficient than traditional sprinklers. They lose almost no water to evaporation or wind drift.
- Builds Healthier, Drought-Resistant Plants: Water goes deep into the soil. This encourages roots to grow down, not stay shallow. Deep roots mean tougher plants that can handle our heatwaves.
- Saves You Time (The Ultimate Luxury): Imagine your garden watering itself while you have a coffee. Connect your system to a simple timer, and it will. No more dragging hoses.
- Reduces Weeds and Disease: Water goes only to your plants, not the spaces between them. This means fewer weeds. Watering at the soil level (not on leaves) also helps prevent fungal diseases.
Think of a drip irrigation system Australia backyard not as an expense, but as an investment. It pays you back in lower water bills, a healthier garden, and more free time.
Step 1: Map Your Garden & Plan Your Zones
Don’t buy anything yet. First, be a detective. Grab a notepad and walk your garden.
- Draw a Simple Map: Sketch your backyard. Mark where your garden beds, pots, and lawn are. Note where your outdoor tap is.
- Group Plants by Water Need: This is called zoning. Your thirsty veggie patch is one zone. Your drought-tolerant native shrubs are another. Your potted plants are a third zone. A drip irrigation system Australia backyard design works best when each zone can be watered separately.
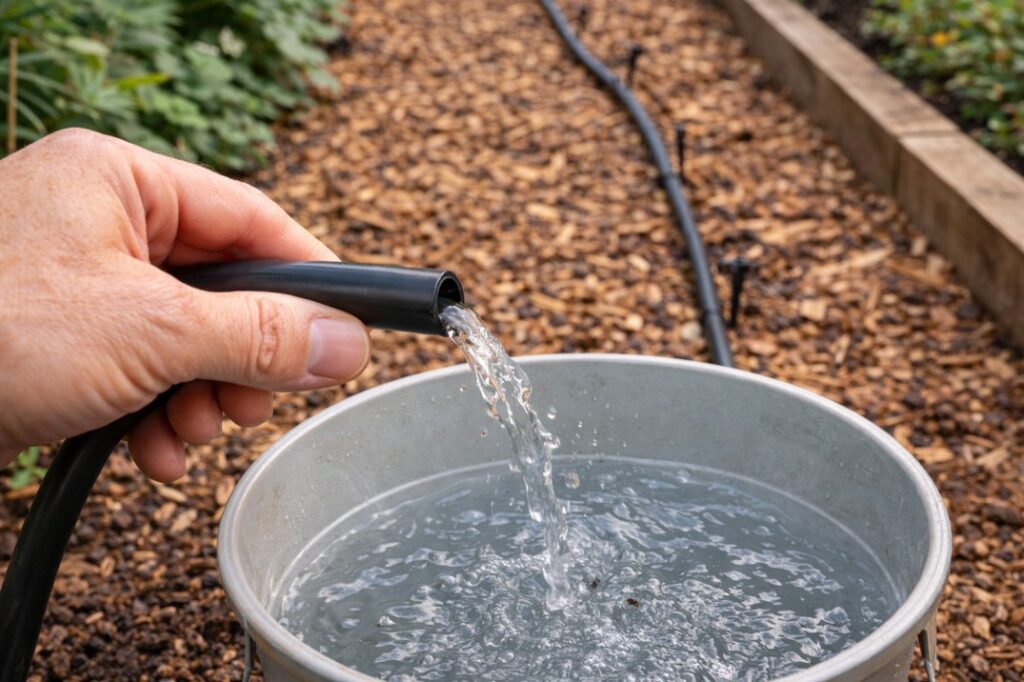
- Measure Your Water Pressure & Flow: This is easy. Take a 9-litre bucket and time how long it takes to fill from your tap. If it fills in 60 seconds, you have a flow rate of 9 litres per minute. This number is crucial for choosing the right parts.
For help designing a productive space to water, our guide on small backyard gardening ideas Australia can provide great layout inspiration.

Step 2: Understand the Core Parts of a Drip System
A drip irrigation system Australia backyard kit is like a Lego set. Once you know the pieces, it’s simple.
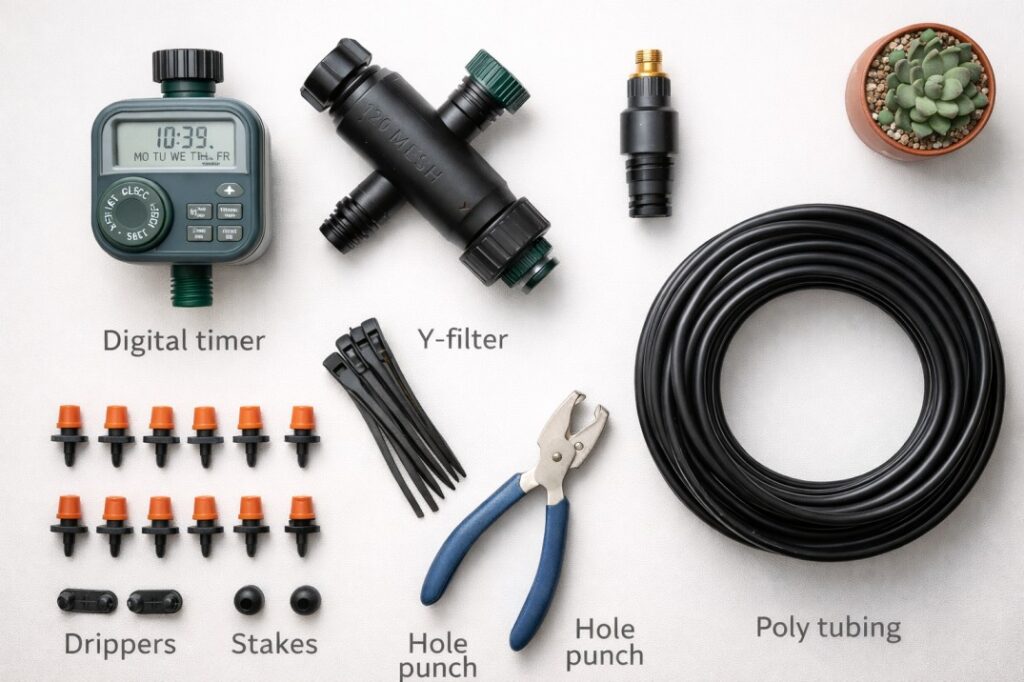
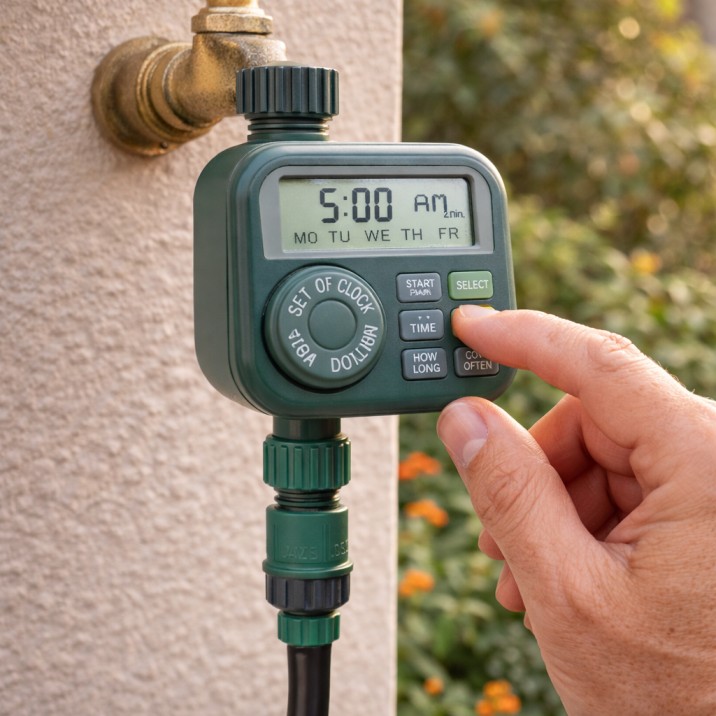
- The Timer (Controller): This screws onto your tap. It automates everything. You set it to water at 5 AM for 20 minutes. Basic digital ones are very affordable.
- The Filter: A small, essential part that goes after the timer. It stops tiny bits in the water from clogging your drippers. Never skip this.
- The Pressure Regulator: Mains water pressure is too high for drip lines. This part reduces the pressure to a gentle, steady flow the system needs.
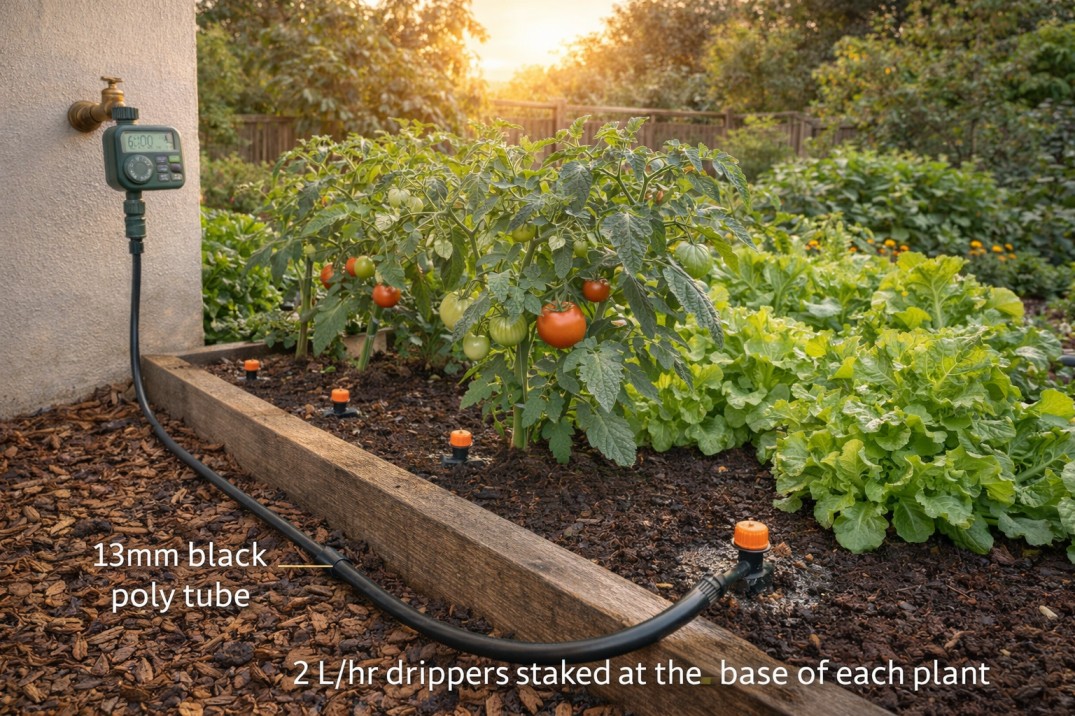
- Poly Tubing (The Main Line): This is the flexible black hose (usually 13mm or 19mm) that carries water from the tap around your garden.
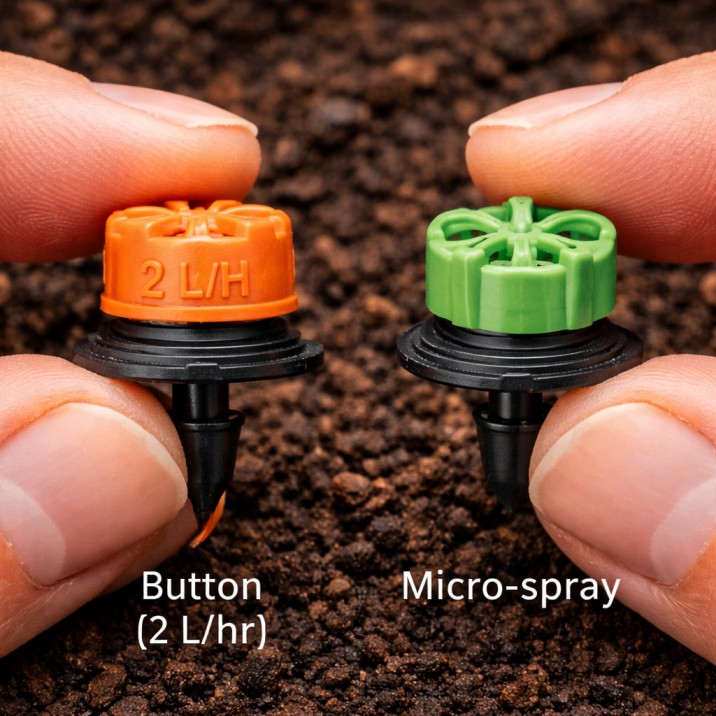
- Drippers & Micro-Sprays: These are the emitters that deliver the water. Drippers (like 2 L/hr or 4 L/hr) are perfect for individual plants or rows. Micro-sprays cover a wider area, good for groundcovers or veggie patches.
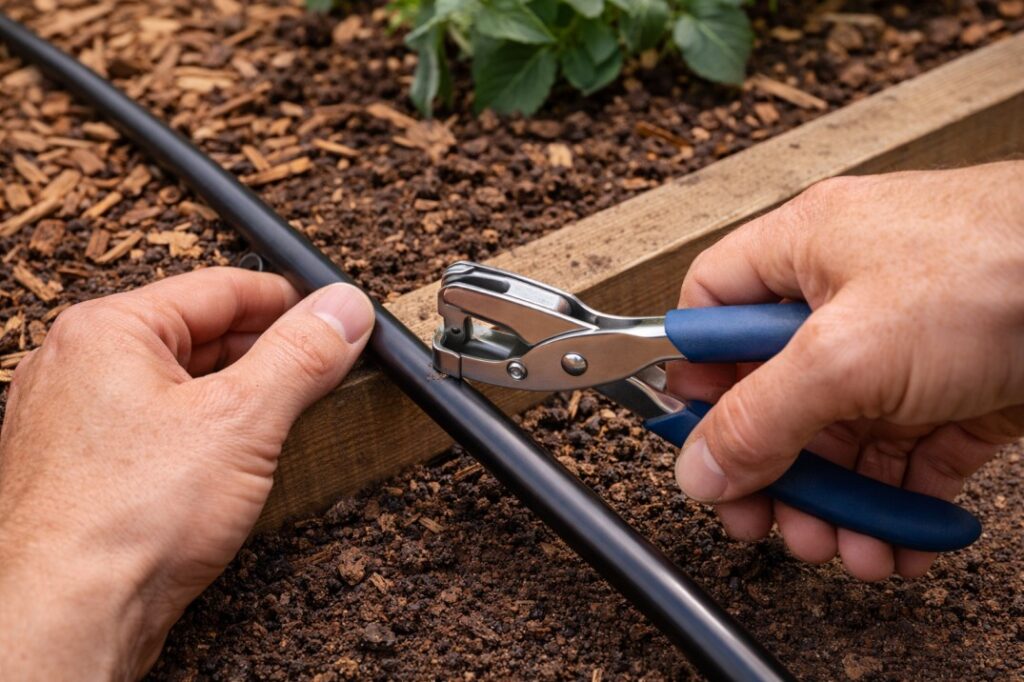
- Hole Punches, Stakes, and Goof Plugs: The little things that make installation easy. You punch a hole in the poly tube, plug in a dripper, and stake it in place.
Step 3: Choose the Right Emitters for Your Plants
This is where you match the tool to the job. The right emitter makes all the difference.
- Use Drippers for:
- Individual shrubs, trees, and roses.
- Rows of vegetables (like tomatoes, capsicums).
- Pots and planter boxes.
- Use Micro-Sprays for:
- Dense groundcover plants.
- Broad, closely planted garden beds.
- Seedling trays.
- Use Drip Line (Inline Dripper Tubing) for:
- Long, straight rows in a vegetable garden. This is tubing with drippers built in at set intervals (e.g., every 30cm).
Step 4: Install Your System – A Step-by-Step Walkthrough
Let’s build a simple system for one garden bed. You can expand from here.
- Connect at the Tap: Screw on your timer, then the filter, then the pressure regulator. Use Teflon tape on the threads to prevent leaks.
- Lay Out the Main Poly Tube: Run the black tubing from the tap along the edge of your garden bed. Use landscape stakes to hold it in place. Don’t cut it yet.
- Install Emitters: Decide where each plant is. Use your hole punch to make a hole in the poly tube at each spot. Push the dripper or a short length of microtube (1-3mm spaghetti tube) into the hole. Run the microtube to the base of the plant and stake the dripper in place.
- Close the End: Once all emitters are in, cut the poly tube and fold the end over, securing it with a figure-8 end clamp or a goof plug. This seals the system.
- Flush and Test: Before you bury or mulch anything, turn the system on. Let it run for a few minutes to flush out any debris. Check every connection and dripper for leaks or blockages.
Pro Tip: Install your drip irrigation system Australia backyard setup under a layer of mulch. This protects the lines from UV damage and hides them, so all you see is a beautiful, well-watered garden.
Step 5: Connect to a Timer and Set a Schedule
Automation is the final magic touch. Your timer does the work for you.
- Best Time to Water: Program your drip irrigation system Australia backyard to run in the early morning, just before dawn. This minimises evaporation and gives plants water for the day ahead.
- How Long to Water: This depends on your soil and plants. Start with 20-30 minutes. The next day, dig a small hole near a dripper. If the soil is moist 15-20cm down, you’ve watered enough. If it’s dry, increase the time. Sandy soil needs shorter, more frequent runs. Clay soil needs longer, less frequent soaks.
For the ultimate in self-sufficiency, connect your system to a rainwater source. Learn how to integrate it with our guide on rainwater harvesting backyard Australia.
Step 6: Maintain Your System for Long-Term Performance
A little maintenance prevents big problems. It’s easy.
- Monthly: Turn on the system and walk along it. Look for leaks, broken stakes, or plants that have grown over drippers. Make sure your filter is clean.
- Seasonally: At the start of spring, do a full system check. Flush the lines by opening the end caps and letting water run through. Replace any cracked tubing or clogged drippers.
- Winter (Frost-Prone Areas): If you get frosts, you must winterise your drip irrigation system Australia backyard. Disconnect the timer, drain all the water from the lines, and store the timer indoors.
Step 7: Troubleshoot Common Problems
Even the best system can have hiccups. Here’s how to fix them.
- No Water Coming Out: Check the timer is on and the tap is open. Is the filter clogged? Clean it.
- Water Spraying from a Connection: A connection is loose. Turn off the water, disconnect, and reconnect it firmly. Check the O-ring isn’t damaged.
- Some Plants Getting Too Much/Little Water: Drippers can clog or vary in output. Flush them or replace them. You can also adjust the length of your watering time for that specific zone.
- Low Pressure at the End of the Line: Your line might be too long for the water flow. Try dividing the zone into two separate lines run from the tap, or use larger diameter (19mm) poly tubing for long runs.

Your Drip Irrigation Shopping List for a Starter Kit
To make it even easier, here’s what you’ll likely need for one 3m x 1m garden bed:
- 1 x Digital Tap Timer
- 1 x Y-Strainer Filter (150 mesh)
- 1 x Pressure Regulator (for 100-150 kPa)
- 25m roll of 13mm Poly Tubing
- 10 x 2 L/hr Drippers
- 10 x Dripper Stakes
- 1 x Hole Punch Tool
- 2 x Figure-8 End Clamps
- Assorted Goof Plugs & Joiners
You can buy these as a kit from hardware stores or online irrigation specialists.
Installing a drip irrigation system Australia backyard is one of the most rewarding projects you can do. It turns watering from a chore into a solved problem. You give your plants exactly what they need, save a precious resource, and buy back hours of your weekend.
Start small with one bed. Learn the basics. Enjoy the results. Before long, you’ll be looking at the rest of your garden, planning where to run the next line. It’s that satisfying. Ready to stop wasting water and start growing smarter?
1 thought on “7 Essential Steps for a Perfect Drip Irrigation System Australia Backyard”