Let me tell you about my first attempt at a veggie patch. I dug up a corner of the lawn, hit clay so hard my shovel rang, and ended up with a sad, waterlogged rectangle that grew more weeds than tomatoes. My back ached for days. Maybe you’ve been there too.
Then I discovered the magic of raised garden beds. It was a game-changer. Suddenly, I had control over the soil. My back thanked me. The snails had to work harder. And my plants? They thrived.
Building a DIY Raised Garden Bed Australia style is one of the most rewarding projects you can do for your garden. It’s not about fancy carpentry skills. It’s about creating the perfect home for your plants. Whether you want to grow herbs, flowers, or your own best vegetables to grow in Australia backyard, a raised bed makes it easier.
This guide will walk you through the entire process. We’ll cover planning, materials, building, and filling your bed. I’ll share the mistakes I made so you can avoid them. By the end, you’ll have everything you need to build a bed that will last for years.
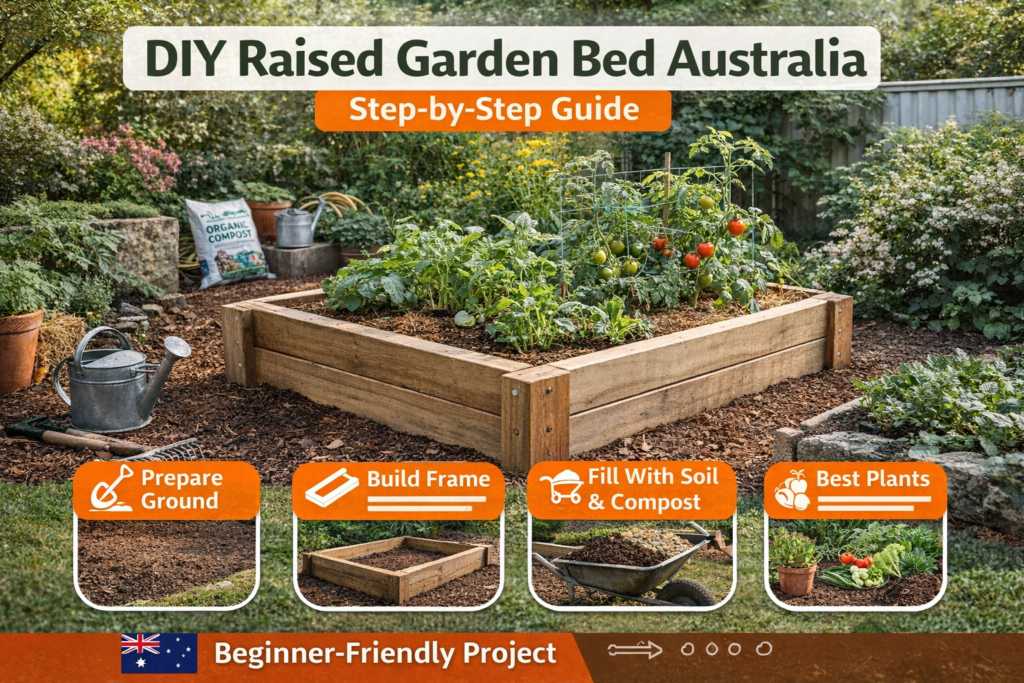
Table of Contents
Why Go Raised? The Benefits for Australian Gardens
Before we grab the tools, let’s talk about why raised beds work so well here in Australia.
Better Drainage: Many Australian soils are heavy clay. They hold water like a sponge. Raised beds drain freely, preventing roots from rotting during our wet winters.
Warmer Soil: The soil in a raised bed warms up faster in spring. This means you can plant earlier. Your tomatoes will get a head start.
No More Back Pain: Bending down to ground level is tough on your back. A raised bed brings the garden up to you. This is especially good as we get older.
Weed Control: Starting with fresh soil means fewer weeds. If you build it right, you can stop grass and weeds from creeping in.
Pest Protection: It’s easier to add snail tape or netting to a raised bed. You’re not fighting ground-level pests as much.
Soil Control: You get to choose the perfect soil mix. No more battling with your native clay or sand.
Accessibility: This is a big one. For gardeners with mobility issues, a raised bed can mean the difference between gardening and not gardening at all. You can even build them to wheelchair height.
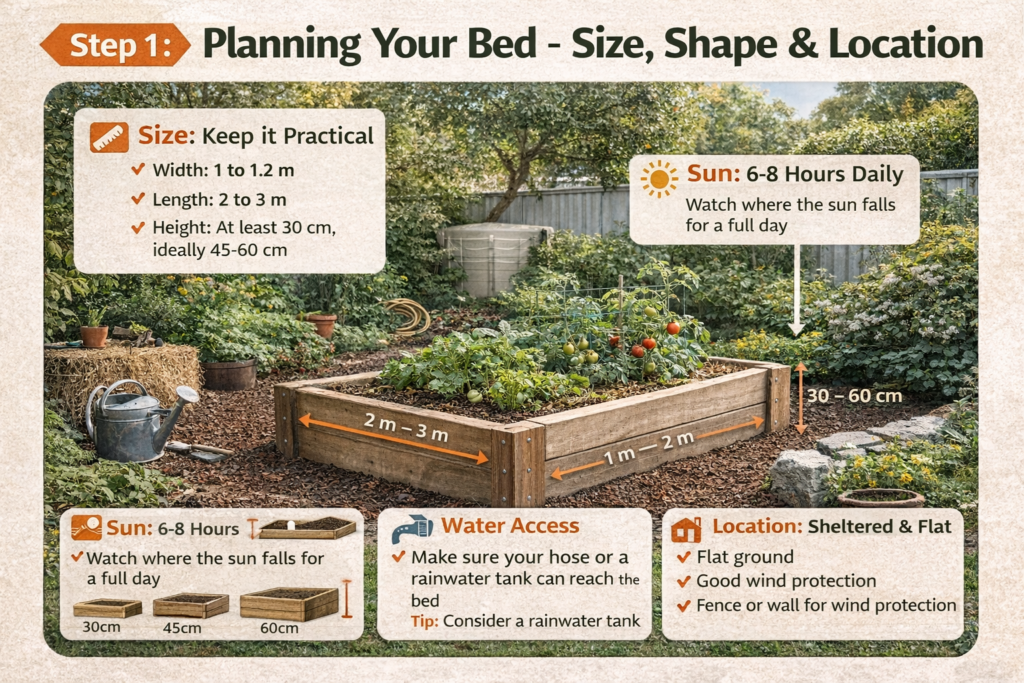
Step 1: Planning Your Bed – Size, Shape & Location
Don’t just start building. A little planning saves a lot of trouble later.
The Golden Rule: Don’t make it too wide. You need to reach the middle without stepping in the bed. For most people, 1.2 metres wide is perfect. You can reach from either side.
Length: This is flexible. 2-3 metres is a good starting point. Any longer and you might want to add bracing in the middle.
Height: This is important. At least 30cm high is good for most plants. For deeper-rooted veggies like carrots, go for 45cm. If you have back problems, consider 60cm or higher – you can even garden while sitting!
Shape: Rectangles are easiest, but don’t be afraid of L-shapes or U-shapes if they fit your space better. Just remember the width rule.
Location, Location, Location:
- Sun: Most veggies need 6-8 hours of direct sun. Watch your yard for a day. See where the sun falls.
- Access to Water: You’ll be watering often. Make sure your hose reaches, or plan for a rainwater system. Speaking of water, a raised bed pairs perfectly with the best rainwater tank for small backyards in Australia for sustainable watering.
- Flat Ground: A level spot makes building much easier.
- Wind Protection: If you’re in a windy area, consider a spot near a fence or wall for shelter.
Step 2: Choosing Your Materials (The Big Decision)
What you build with matters for looks, cost, and how long it lasts.
Treated Pine (H3 or H4):
- Pros: Affordable, readily available at any hardware store.
- Cons: Treatment chemicals (though modern ACQ treatment is much safer than old CCA).
- Tip: Line the inside with heavy-duty plastic if you’re worried about chemicals leaching.
- Cost: $$$
Hardwood (Ironbark, Jarrah):
- Pros: Beautiful, natural, lasts 10-20 years without treatment.
- Cons: More expensive, heavier, harder to work with.
- Tip: Look for recycled hardwood – it’s often cheaper and has character.
- Cost: $$$$
Corrugated Steel (Galvanised or Colorbond):
- Pros: Modern look, very long-lasting, no chemicals.
- Cons: Can get hot in full sun (insulate the inside), edges can be sharp.
- Tip: Use timber for the corners to soften the look.
- Cost: $$$$
Bricks or Concrete Blocks:
- Pros: Permanent, great thermal mass (keeps soil temperature stable).
- Cons: More labour intensive, less flexible if you want to move it.
- Cost: $$ (for blocks) to $$$$ (for bricks)
Recycled Materials:
- Pros: Eco-friendly, cheap, unique character.
- Cons: Inconsistent sizes, may not last as long.
- Ideas: Old railway sleepers, wine barrels cut in half, recycled plastic boards.
- Cost: $
For Beginners: I recommend H3 Treated Pine (200mm x 50mm). It’s easy to work with and gives you a good depth. It’s the most forgiving material for your first DIY Raised Garden Bed Australia project.
Step 3: The Tools You’ll Actually Need
You don’t need a workshop full of tools. Here’s what you’ll actually use:
Essential Tools:
- Tape measure
- Spirit level (at least 60cm long)
- Saw (hand saw or circular saw)
- Drill with screwdriver bit
- Spade or shovel
- Wheelbarrow (for moving soil)
- Pencil or chalk for marking
- Safety glasses
Nice to Have (But Not Essential):
- Electric screwdriver (saves your wrist)
- Square (to make sure corners are 90 degrees)
- Work gloves
- Clamps (to hold timber while screwing)
- Mallet (for tapping things into place)
If Using Power Tools: Always read the safety instructions first. Wear appropriate protection. And if you’re not confident, ask for help. There’s no shame in it.
Step 4: The Build – A Simple, Strong Design
Let’s build a simple 1.2m x 2.4m bed from treated pine. This is a classic, sturdy design that works for most gardens.
Shopping List (for 30cm height):
- 6 x 1.2m lengths of 200mm x 50mm timber (for the long sides)
- 4 x 30cm lengths of 200mm x 50mm timber (for the ends)
- 12 x 100mm galvanised timber screws (weather-resistant)
- 4 x star pickets or timber stakes (for corner reinforcement)
- Optional: Weed mat or cardboard for base
Building Steps (Take Your Time):
- Cut Your Timber: Cut two of your long pieces to 2.4m if they aren’t already. Cut your end pieces to 30cm. Measure twice, cut once!
- Assemble the Sides: Lay two long pieces (2.4m) parallel on the ground, about 30cm apart. Place a 30cm end piece between them at each end to form a rectangle. It should look like a picture frame lying flat. The end pieces should fit snugly between the long pieces.
- Screw Together: Pre-drill holes to prevent splitting. Drill two screws through the long sides into each end piece. Make sure everything is square. A quick trick: measure diagonally from corner to corner. If both measurements are equal, you’re square.
- Repeat: Make an identical second layer. This will sit on top to give you your height.
- Prepare the Site: Clear grass and weeds from your chosen spot. Level the ground as much as you can. Use your spirit level on the ground itself. You don’t need it perfect, but close helps.
- Position and Stack: Place your first frame on the prepared ground. Check it’s level. Place the second frame on top, staggering the corners for strength. Screw the layers together at the corners.
- Add Corner Support: Hammer a star picket or timber stake into the ground at each inside corner. Screw the bed frame to these supports. This stops the bed bowing out when filled with soil. This step is crucial – don’t skip it!
Pro Tip: If you’re building on sloping ground, you’ll need to step the bed. This means one side will be higher than the other. It takes more planning but works well. Essentially, you’re building a series of level boxes that follow the contour of your land.

Step 5: The Secret Weapon – Lining & Drainage
This step prevents weeds and helps drainage. It’s the difference between a good bed and a great one.
Weed Barrier: Lay a layer of cardboard (remove any tape first) or commercial weed mat at the bottom. This stops grass and weeds growing up into your beautiful new soil. The cardboard will eventually break down, but by then, your plants will be established.
Drainage: If you have very heavy clay soil underneath, consider drilling a few extra holes in the bottom layer of timber. Or add a 5cm layer of coarse gravel before your soil. This creates a drainage layer.
For Chemically Treated Timber: If you’re concerned about chemicals leaching into your soil (particularly important if growing edibles), line the inside with heavy-duty plastic or builders’ film. Just make sure you punch a few drainage holes in it at the bottom.
Gopher/Animal Protection: If you have problems with burrowing animals, consider laying hardware cloth (metal mesh) at the bottom before adding your soil.
Step 6: Filling Your Bed – The Soil Recipe
This is where your plants will live. Don’t skimp here. The soil is everything. Think of it as the mattress your plants sleep on – you want it comfortable and nourishing.
The Perfect DIY Raised Garden Bed Australia Soil Mix (for 1.2m x 2.4m x 0.3m bed):
This makes about 0.86 cubic metres of soil. You might need to adjust based on your exact bed size.
- 5 parts Premium Garden Soil or Compost: The base. Buy good quality stuff. This is not the place for cheap, sandy “fill dirt.”
- 2 parts Well-Rotted Manure: Cow, sheep, or chook manure aged for at least 6 months. Fresh manure will burn your plants.
- 2 parts Coarse Sand: For drainage. River sand or horticultural sand is perfect. Don’t use fine brickies’ sand – it compacts.
- 1 part Coconut Coir or Peat Moss: Helps retain moisture. Coir is more sustainable.
- A few handfuls of Worm Castings: If you have them from your compost bin vs worm farm Australia system, this is gold. It’s like a probiotic for your soil.
- Optional: A cup of blood and bone or pelletised chicken manure for slow-release nutrients.
Mixing: This is a wheelbarrow job. Mix thoroughly before adding to the bed. It’s like making a giant cake. Fill to about 5cm from the top – you need space for mulch and water.
Cost Saving Tip: Order bulk “vegetable garden mix” from a landscape supplier. It’s cheaper than bags and usually a good blend. Call around and ask for their specific raised bed mix recipe.
How Much Soil? A quick calculation: Length (m) x Width (m) x Height (m) = Volume in cubic metres. Our example bed (2.4 x 1.2 x 0.3) needs about 0.86 cubic metres. Suppliers usually sell by the cubic metre or half cubic metre.
Step 7: Planting & Ongoing Care
Your DIY Raised Garden Bed Australia is ready! Now for the fun part.
Let it Settle: Water the soil well and let it settle for a few days before planting. It will sink a bit – you can top it up with more of your soil mix.
First Planting: Start with easy, rewarding crops. Good choices include:
- Lettuce and salad greens (pick leaves as you need them)
- Radishes (ready in 4 weeks – instant gratification!)
- Bush beans
- Spring onions
- Herbs like basil, parsley, and chives
Planting Technique: Follow spacing instructions on seed packets or plant tags. In a raised bed, you can plant a bit closer together than in the ground (called intensive planting). Gently firm soil around seedlings and water them in well.
Watering: Raised beds drain well, so they dry out faster. You’ll need to water more often, especially in summer. Check by sticking your finger into the soil. If it’s dry 2-3cm down, it’s time to water. Water deeply in the morning.
Mulching: Once plants are established, add a 5-7cm layer of mulch (sugar cane, pea straw, or lucerne). This conserves water, suppresses weeds, and keeps roots cool.
Feeding: Top dress with compost or aged manure each season. The nutrients will wash through over time. You can also use liquid fertilisers like seaweed solution every few weeks during the growing season.
Crop Rotation: Don’t plant the same family of vegetables in the same spot year after year. It helps prevent disease and nutrient depletion. A simple rotation is: Leaf crops (lettuce, spinach) → Fruit crops (tomatoes, capsicum) → Root crops (carrots, beetroot) → Legumes (beans, peas).
Common Mistakes to Avoid
I’ve made these so you don’t have to:
- Making it too wide: You’ll compact the soil reaching in, and you might even fall in!
- Using poor quality soil: It’s false economy. Your plants won’t thrive, and you’ll be disappointed.
- Forgetting about paths: Leave at least 60cm between beds for comfortable access with a wheelbarrow.
- Not securing the corners: The weight of wet soil is enormous. Your bed will bulge and eventually fail.
- Planting too intensively too soon: Start simple. You can always add more plants next season.
- Not considering height: Think about what you’re planting. Tall plants (climbing beans, tomatoes) should go at the north end so they don’t shade shorter plants.
- Ignoring the seasons: Australia has diverse climates. What works in Melbourne won’t work in Brisbane at the same time. Use a local planting guide.
Adapting for Australian Conditions
Hot, Dry Climates (QLD, NT, WA, SA):
- Consider partial afternoon shade from a deciduous tree or shade cloth
- Use lighter coloured materials (pale timber, painted beds) to reflect heat
- Mulch heavily (up to 10cm) to conserve moisture
- Consider drip irrigation on a timer – it’s a water-saver
Cool, Temperate Climates (VIC, TAS, NSW high country, southern WA):
- Position for maximum winter sun
- Dark-coloured materials can help warm the soil in spring
- Consider a clear plastic cover or cloche to create a mini greenhouse in early spring
- Plant winter crops like broccoli, kale, and spinach
Urban Spaces & Balconies: Even a small DIY Raised Garden Bed Australia on a balcony or courtyard can produce a surprising amount of food. Just ensure it’s not too heavy for your structure. Use lightweight soil mixes with lots of coir and perlite. Consider self-watering pots or wicking beds if you’re forgetful with watering.
The First Season: What to Expect
Your first season is a learning experience. Some things will thrive. Others might fail. That’s normal.
Keep a simple garden journal. Note:
- What you planted and when
- What did well and what didn’t
- Pest problems and what worked to solve them
- Weather patterns
This record is invaluable. Next year, you’ll know that tomatoes planted in October did better than those planted in November. Or that the snails loved your lettuce but left the silverbeet alone.
Your Next Project: Beyond the Basic Bed
Once you’ve mastered one bed, the possibilities expand:
- Trellises & Supports: Add a timber or steel trellis for climbing beans, peas, or cucumbers. You can attach it directly to the bed.
- Netting Frames: Build a simple frame from PVC pipe or timber to support bird netting or insect mesh.
- Cold Frames & Cloches: Extend your season with removable covers.
- Companion Planting: Plant flowers like marigolds and nasturtiums among your veggies to attract beneficial insects and deter pests.
- Succession Planting: As you harvest one crop, immediately plant another in its place to maximise yield.
The Real Reward
Building a DIY Raised Garden Bed Australia is about more than growing food. It’s about getting your hands in the soil. It’s about watching seeds become plants. It’s about the pride of eating something you grew yourself.
It’s also a cornerstone of an eco friendly backyard Australia. You’re growing your own food, reducing food miles, creating habitat, and building healthy soil. That ripple effect is powerful.
The best time to start was last year. The second-best time is this weekend. Pick your spot, buy your materials, and get building. Your future self – and your future salads – will thank you.
Remember: Every gardener was once a beginner. Every beautiful, productive bed started as just an idea. Yours can too.
5 thoughts on “7 Essential Steps for the Perfect DIY Raised Garden Bed Australia Project”