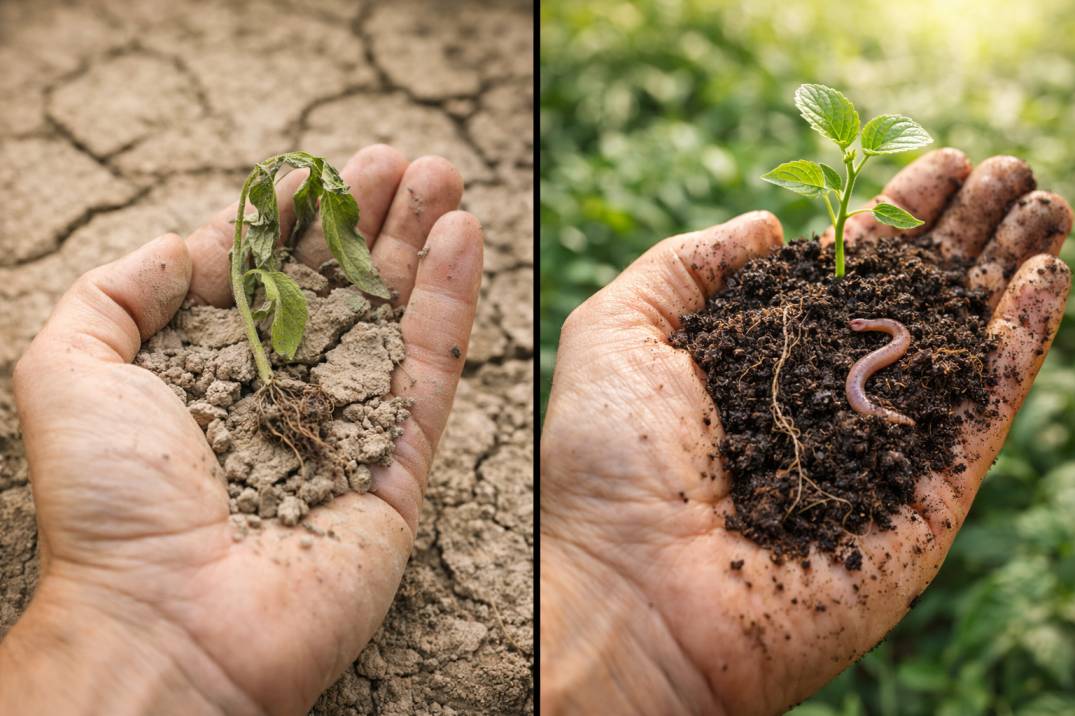
Improve garden soil Australia, this simple phrase is the key to unlocking your most productive, resilient, and beautiful garden. It’s the difference between fighting against your plot every season and working with a vibrant, supportive ecosystem. If you’ve ever felt like you’re pouring water, fertiliser, and effort into the ground with little to show for it, the secret isn’t in the plant you choose, but in the earth beneath it.
G’day, I’m Mehedi. Over years of gardening from Tasmania to Queensland, I’ve learned our ancient Australian soils need a particular kind of love. They aren’t like the fertile loams you read about in European gardening books. Ours are ancient, often nutrient-poor, and can be as tough as nails. But with the right knowledge, you can transform any patch of dirt into a living, breathing foundation for abundance.
This guide is your practical manual. We’ll move beyond quick fixes and dive into how to truly understand and nurture your soil. You’ll learn how to read its signs, feed it the right way, and build a system that gets better each year. Let’s stop gardening in your soil and start gardening with it.
Table of Contents
Part 1: Getting to Know Your Soil – It’s More Than Just Dirt
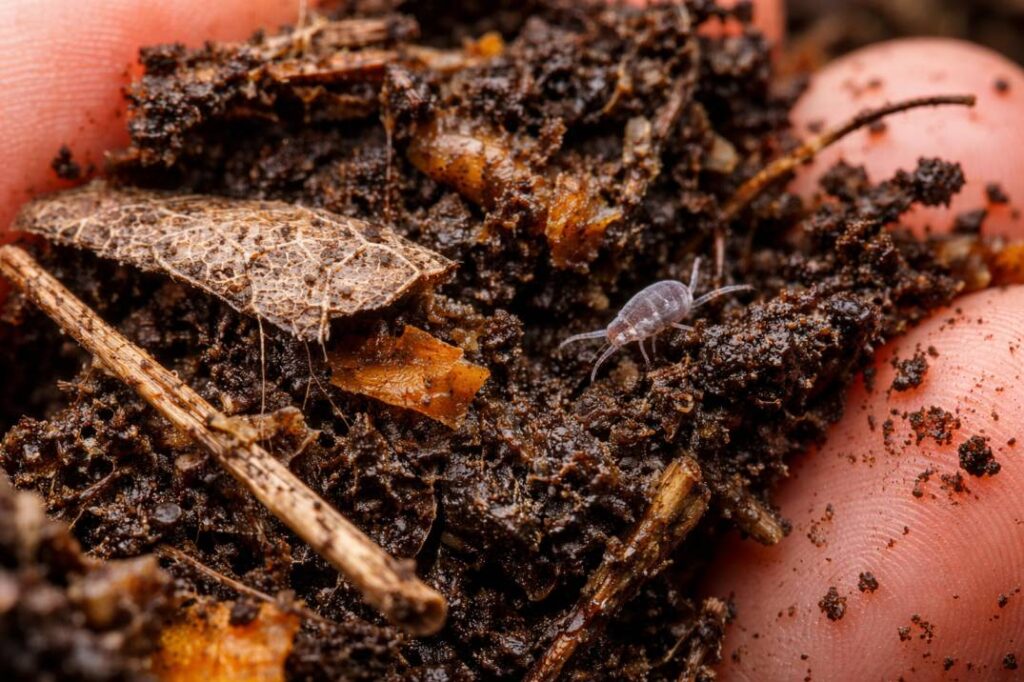
Think of soil as a bustling city. Mineral particles (sand, silt, clay) are the buildings and roads. The air and water in the gaps are the transport systems. And the living organisms, from earthworms to bacteria, are the citizens that keep everything functioning. Healthy soil is a balance of all these elements.
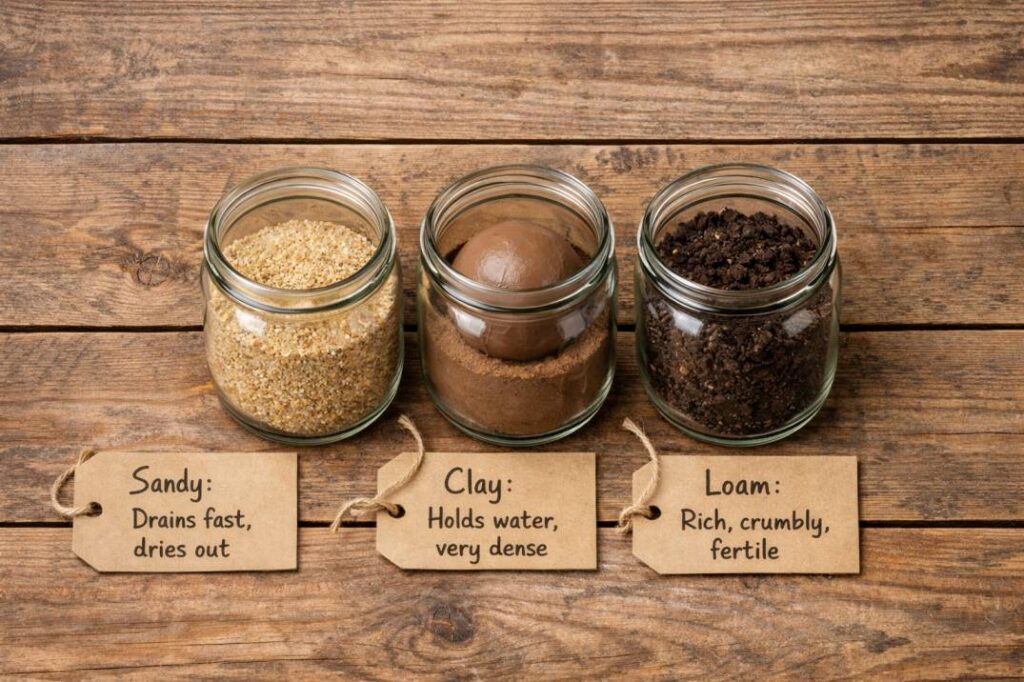
The Big Three: Understanding Australian Soil Types
Your first step to improve garden soil Australia is to know what you’re starting with. Grab a handful of moist (not wet) soil and give it a squeeze.
- Sandy Soil: It feels gritty and falls apart immediately. It drains brilliantly but struggles to hold onto water and nutrients. Common in Western Australia and coastal areas.
- Clay Soil: It feels sticky and can be rolled into a smooth, firm sausage. It holds nutrients well but drains poorly, becoming waterlogged in winter and concrete-hard in summer. Widespread across many parts of the country.
- Loam: The gardener’s gold. It holds its shape when squeezed but crumbles easily when poked. It’s a perfect balance. Most of us are building towards this.
Many Australian gardens have “duplex” soils, a harsh contrast, like a shallow layer of sand sitting on top of heavy clay, which creates unique challenges with drainage and root growth.
The 5 Clear Signs Your Soil is Calling for Help
Your plants and the earth itself will tell you when something’s wrong. Look for these red flags:
- Water Pools or Runs Off: After rain or watering, if water sits on the surface or races away without soaking in, you have compaction or poor structure.
- Concrete-Like Hardness: If you struggle to push a trowel into the ground, your soil is compacted. Roots, water, and air can’t move freely.
- Yellow Leaves & Stunted Growth: Classic signs of nutrient deficiencies. Your plants are literally starving.
- Weeds Outcompete Everything: A lawn of dandelions or capeweed in a struggling veggie patch is a sign of imbalance. Weeds are pioneers of poor soil.
- Cracking or Erosion: Soil that cracks deeply when dry or washes away easily lacks the organic matter for soil structure that binds it together.
If you see these signs, don’t worry, they’re just your soil’s way of asking for attention.
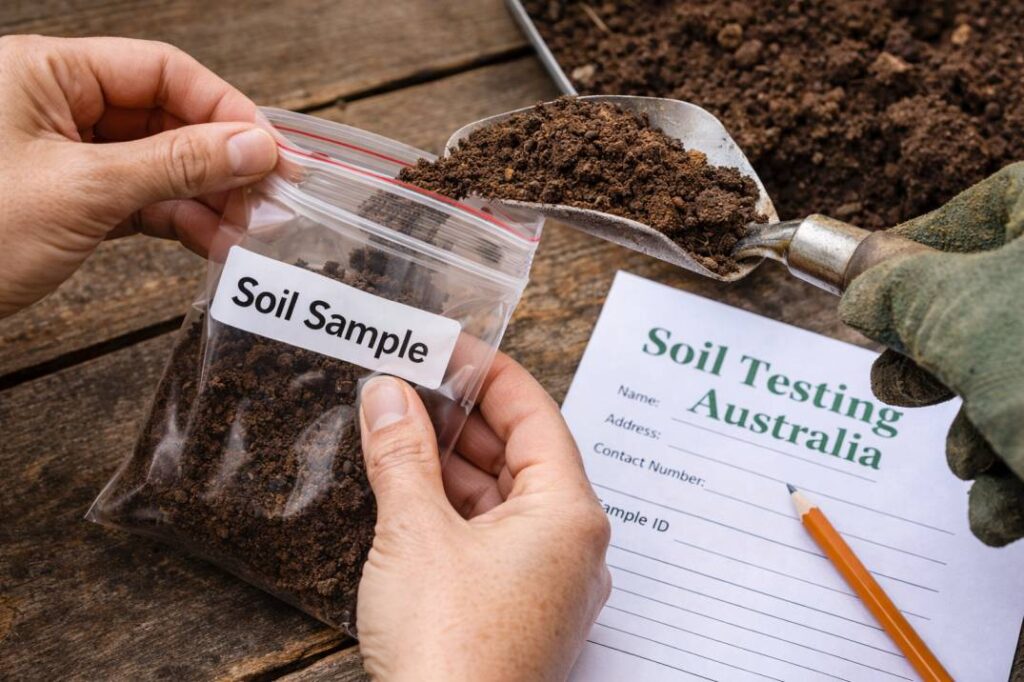
Part 2: The Diagnosis – Why Soil Testing Australia is Your Best Investment
Before you start adding anything, you need to know what you’re dealing with. Guessing can waste money and time, or even make problems worse. This is where soil testing Australia practices come in.
What a Good Test Tells You
A proper test is like a medical check-up for your garden. It will tell you:
- Soil pH (Acidity/Alkalinity): This is critical. pH affects how available nutrients are to plants. Most veggies and garden plants love a slightly acidic to neutral pH (between 6.0 and 7.0). Australia has vast areas of naturally acidic soil.
- Key Nutrient Levels: The big three are Nitrogen (N) for leaf growth, Phosphorus (P) for roots and flowers, and Potassium (K) for overall health.
- Organic Matter Percentage: This measures the heart of your soil’s fertility and structure.
- Additional Factors: Some tests can reveal salinity (too much salt) or sodicity (too much sodium, a major issue in Australian soils that causes clay to disperse into a sticky mess).
How to Test Your Soil: From DIY to Professional
- DIY Test Kits: Available at nurseries. They give a basic, colour-coded indication of pH and NPK. Good for a rough idea, but not for precise treatment.
- Professional Laboratory Testing: This is the gold standard. You send a sample to a lab (like those accredited by NATA). For a small fee, you get a detailed report with specific recommendations. It’s the single best investment you can make for a new garden or a chronically problematic bed. Government resources like the Australian National Soil Information System (ANSIS) can also provide broader context for your region.
Pro Tip: When taking a sample, scrape away any mulch, then take thin slices of soil from the top 10-15cm (the root zone) from several spots in your garden bed. Mix them together in a clean bucket and send about a cup of this mixed soil for testing.
Part 3: The Cure – Practical Steps to Transform Your Soil
Now for the action. Improving soil isn’t a one-time event; it’s an ongoing process of feeding and protecting the ecosystem. Here are your core strategies.
Strategy 1: Feed the Soil with Organic Matter
This is the universal remedy. Organic matter for soil is anything that was once alive and is now decomposing. It’s the magic ingredient that fixes sandy and clay soils alike.
- What it does: In sand, it acts like a sponge, holding water and nutrients. In clay, it binds particles into larger crumbs, creating space for air and drainage. It feeds the entire soil food web.
- How to Add It:
- Compost: The king of soil amendments. You can make your own (see our Ultimate Australian Guide to Backyard Composting) or buy it in bulk. Work a 5-10cm layer into new beds, or use it as a top-dress each season.
- Well-Aged Manure: Cow, horse, or chicken manure (aged for at least 6 months so it’s not “hot”). A fantastic nutrient boost.
- Leaf Litter & Grass Clippings: Can be dug in or left as a surface layer to break down naturally.
Strategy 2: Protect and Nourish with Mulch
Mulch is the blanket that keeps your soil healthy. A 5-7cm layer on top of your beds does wonders.
- The Benefits: Suppresses weeds, retains precious soil moisture, protects from temperature extremes, and, as it breaks down, adds more organic matter for soil fertility.
- Best Choices: Sugar cane mulch, pea straw, wood chips, or even lucerne hay. Avoid piling mulch against plant stems to prevent rot.
Strategy 3: Aerate to Relieve Compaction
If your soil is hard, it needs to breathe. Aeration creates channels for air, water, and roots.
- Simple Method: Push a garden fork into the soil about 15-20cm deep and gently rock it back and forth. Do this every 20-30cm across the bed. Avoid turning the soil over completely, as this can damage its structure and microbial life.
- Let Nature Help: Earthworms are master aerators. Encouraging them by adding organic matter is better than any tool.
Strategy 4: Adjust the pH Balance
If your soil testing Australia results show a pH that’s out of whack, here’s how to adjust it:
- To Raise pH (Make Acidic Soil More Alkaline): Add agricultural lime or dolomite. Dolomite also adds magnesium. Follow test recommendations or bag instructions carefully. Effects are slow and take months.
- To Lower pH (Make Alkaline Soil More Acidic): Add sulphur chips or peat moss. This is often needed for growing blueberries, azaleas, or other acid-loving plants.
Crucial Note: Always retest your pH after 6-12 months to see the effect of your amendments.
Strategy 5: Employ Nature’s Helpers – Cover Crops and Deep Roots
Give your soil a living treatment.
- Cover Crops (Green Manure): Sow fast-growing crops like mustard, buckwheat, or broad beans in an empty bed. Before they flower, cut them down and dig the green growth into the soil. This “green manure” adds massive amounts of organic matter and nutrients like nitrogen (especially from legumes).
- Deep-Rooted Plants: Plants like comfrey or daikon radish have taproots that break up compacted subsoil and draw nutrients up from deep down. You can then cut the leaves for mulch or compost, cycling those nutrients to the surface.
Part 4: Australian Soil Solutions by State
While the principles are universal, your local australian soil types might need a tailored approach. Here’s a quick state-by-state cheat sheet based on common challenges.
| State | Common Soil Challenge | Priority Action to Improve Garden Soil |
|---|---|---|
| WA, SA, Coastal NSW | Sandy, nutrient-poor, hydrophobic (water-repellent) | Maximise organic matter for soil (compost, manure). Use soil wetting agents or clay-based products to improve water retention. Mulch heavily. |
| VIC, Inland NSW | Heavy clay, duplex soils, prone to waterlogging & compaction | Focus on aerating and adding gypsum (can help break up sodic clay). Build raised garden beds for guaranteed drainage. Add vast amounts of compost. |
| QLD, NT | Cracking clays, nutrient leaching in wet seasons | Maintain constant soil cover with mulch or plants to prevent crusting. Use cover crops in the dry season. Build up organic matter to improve structure. |
| TAS | Acidic soils, erosion on slopes | Regular soil testing Australia for pH and lime application if needed. Use cover crops to prevent erosion and add organic matter. |
Common Mistakes to Avoid on Your Soil Journey
- Adding Fertiliser to Fix Everything: Fertiliser feeds the plant, not the soil. It doesn’t fix structure, pH, or life. Address the soil first, then fertilise if a test shows a specific need.
- Over-Tilling: Constant digging and turning destroys soil structure, kills worms, and brings weed seeds to the surface. Practise “no-dig” or minimal-dig gardening where you layer amendments on top.
- Walking on Garden Beds: This is the fastest way to cause compaction. Create permanent paths and beds.
- Using Fresh Manure: It can “burn” plants with excess ammonia and may contain harmful pathogens. Always age it first.
- Ignoring Mulch: Leaving soil bare exposes it to sun, wind, and rain, which destroys structure and life.
Your Soil Improvement Action Plan
Feeling overwhelmed? Don’t be. Follow this simple seasonal plan.
- Autumn (Now!): The best time to start. Test your soil. Add lime or sulphur if needed (they take time to work). Apply a thick layer of compost and mulch to beds as they empty.
- Winter: Plan your garden. Sow a green manure crop in any vacant beds. Repair and build raised beds if needed.
- Spring: Gently incorporate any green manure 4-6 weeks before planting. Top-dress established beds with a thin layer of compost. Refresh mulch.
- Summer: Focus on maintaining moisture with mulch. Observe plant health as a sign of soil success.
Frequently Asked Questions
Q: How long does it take to see real improvement?
A: You’ll see some benefits (like better drainage) within a single season with the addition of compost. However, building truly deep, rich, living soil is a 3-5 year journey of consistent care. It’s a marathon, not a sprint.
Q: Can I improve soil in pots and raised beds?
A: Absolutely! The principles are the same. Start with a high-quality potting mix (which is a soilless blend), then rejuvenate it each season by mixing in 25-30% new compost and a slow-release organic fertiliser. Our guide to DIY Raised Garden Beds has more specific soil recipes.
Q: Are worm farms worth it for soil health?
A: 100%. Worm castings are the single best soil conditioner you can get. They are packed with nutrients and beneficial microbes. You can add the castings directly to soil or make “worm wee” liquid fertiliser.
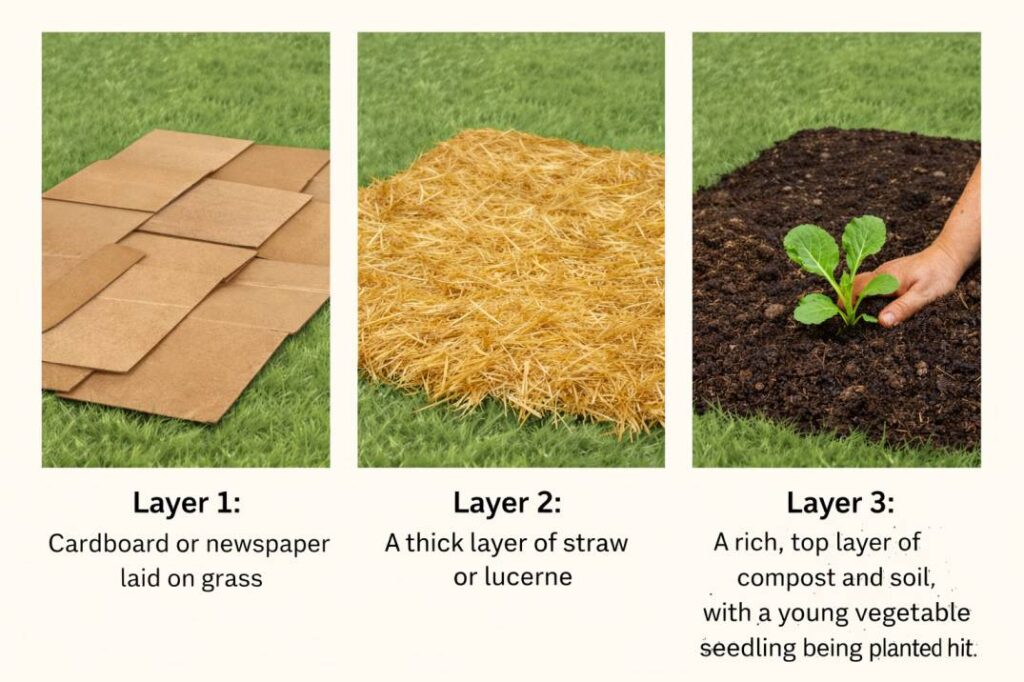
Q: My soil is terrible. Should I just replace it?
A: Removing soil is hard work and often unnecessary. You can create fantastic soil on top of poor subsoil by building a no-dig garden with layers of cardboard, compost, straw, and manure. The worms and microbes will slowly integrate it with the ground below.
Conclusion: Your Garden’s Foundation Awaits
To improve garden soil Australia style is to work with the land, not against it. It moves us from being consumers of bags of potting mix and bottles of fertiliser to being creators of fertility. It’s the most profound shift you can make in your gardening journey.
Start small this weekend. Pick one bed, do the squeeze test, and add a bag of compost. Watch how the earth, and everything you plant in it, responds. Your soil isn’t just a holding place for roots, it’s the living, breathing heart of your garden. Nourish it, and it will nourish you for seasons to come.
Ready for the next step? Learn how to turn your kitchen scraps into gardener’s gold with our beginner’s guide to composting, or discover how to attract native bees and butterflies to your now-thriving garden ecosystem.
8 thoughts on “4 Most Effective Way to Improve Garden Soil Australia: From Dirt to Living Ecosystem”