Let me ask you something that used to keep me up at night during long, dry summers. Why do we pay for treated drinking water to pour on our gardens, when the sky offers us pure, soft water for free? I remember watching a spectacular summer storm roll through Melbourne, only to see every precious drop disappear down the drain. My garden was turning brown, my water bill was climbing, and I felt helpless.
That frustration sparked my journey into rainwater harvesting backyard Australia systems. What started with a single, humble barrel has grown into a complete home system that waters my garden, flushes my toilets, and gives me genuine peace of mind. The transformation wasn’t just in my water bill—it was in my mindset. I went from feeling like a victim of water restrictions to feeling resourceful and prepared.
Maybe you’re tired of watching your plants struggle. Maybe you’re sick of that nagging guilt when you turn on the hose. Or maybe you just love the idea of being more self-sufficient. Whatever your reason, this guide is for you. I’ll walk you through seven clear, actionable steps for rainwater harvesting backyard Australia that work for any home, from a small rental courtyard to a sprawling suburban block. We’ll talk about the simple setups, the smart investments, and the game-changing habits that truly make a difference.
Table of Contents
Why Catching Rain is Your Smartest Australian Gardening Move
Before we look at how, let’s get clear on why. In Australia, rainwater harvesting backyard Australia isn’t just a “nice to have” hobby. It’s a practical response to our reality.
Our climate is defined by extremes—long dry spells punctuated by intense downpours. Traditional gardening fights this cycle. Rainwater harvesting backyard Australia flips it. Instead of letting rain cause erosion and runoff, we capture it. Instead of relying on the mains during drought, we use our reserves.
Here’s what changes when you start harvesting:
- Your Plants Become Healthier: Tap water contains chlorine and salts that can build up in soil. Rainwater is pure, slightly acidic, and packed with natural nitrates. Plants drink it up and reward you with lusher growth.
- You Gain Real Independence: Water restrictions? Not your problem. You’ve got your own supply. That feeling of resilience, of not being at the mercy of utility schedules, is powerful.
- You Save Serious Money: The Australian Government’s Your Home guide notes that a well-planned system can supply a significant portion of your household needs. Outdoor use alone can account for 40% of a bill. That’s money straight back in your pocket.
- You Help Your Community: Every litre you catch is a litre that doesn’t need expensive treatment and pumping from distant dams. You’re directly easing pressure on our shared water grid.
Step 1: The Mindset Shift – See Your Property as a Catchment
The first step in rainwater harvesting backyard Australia isn’t buying a tank. It’s changing how you look at your home. You need to become a water detective.
Go outside when it rains. Seriously, put on a coat and watch. Where does the water go?
- Does it sheet off your roof and vanish into a downpipe?
- Does it pool on your driveway and run into the street?
- Do your garden beds become soggy bogs?
Your roof is your primary catchment area—every square metre is potential storage. But your paved areas, garden beds, and even the slope of your land are all part of your water system. The goal of rainwater harvesting backyard Australia is to slow water down, spread it out, and sink it into your soil. This initial observation is more valuable than any product brochure.
Step 2: Start Small & Simple (The “No-Excuses” Approach)
Overwhelm stops more projects than anything else. You don’t need a $5,000 system to start. Your first foray into rainwater harvesting backyard Australia can happen this weekend for less than $200.
The Rain Barrel Method:
- Get a 200-300 Litre Food-Grade Barrel: Look for ones with a sealed lid and a tap near the bottom.
- The Magic Piece – The Diverter Kit: Don’t just cut your downpipe. A $50-80 rain diverter kit is essential. It clips onto your downpipe and automatically channels water into the barrel. When the barrel is full, it redirects overflow back down the downpipe, protecting your home’s foundations.
- Elevate It: Place your barrel on a few concrete blocks or a sturdy stand. This gives you enough gravity pressure to fill a watering can easily.
- Keep It Clean: Ensure the lid is secure with a fine mesh screen to keep out mosquitoes and leaves.
This simple system teaches you the basics of catchment, storage, and use. It’s perfect for watering a prized veggie patch or a collection of potted natives. For more ideas on maximizing small spaces, see our guide on small backyard gardening ideas Australia.
Step 3: Scale Up with a Purpose-Built Tank
Once you’ve tasted the satisfaction of using rainwater, you’ll likely want to scale up. This is where rainwater harvesting backyard Australia gets serious.
Choosing Your Tank:
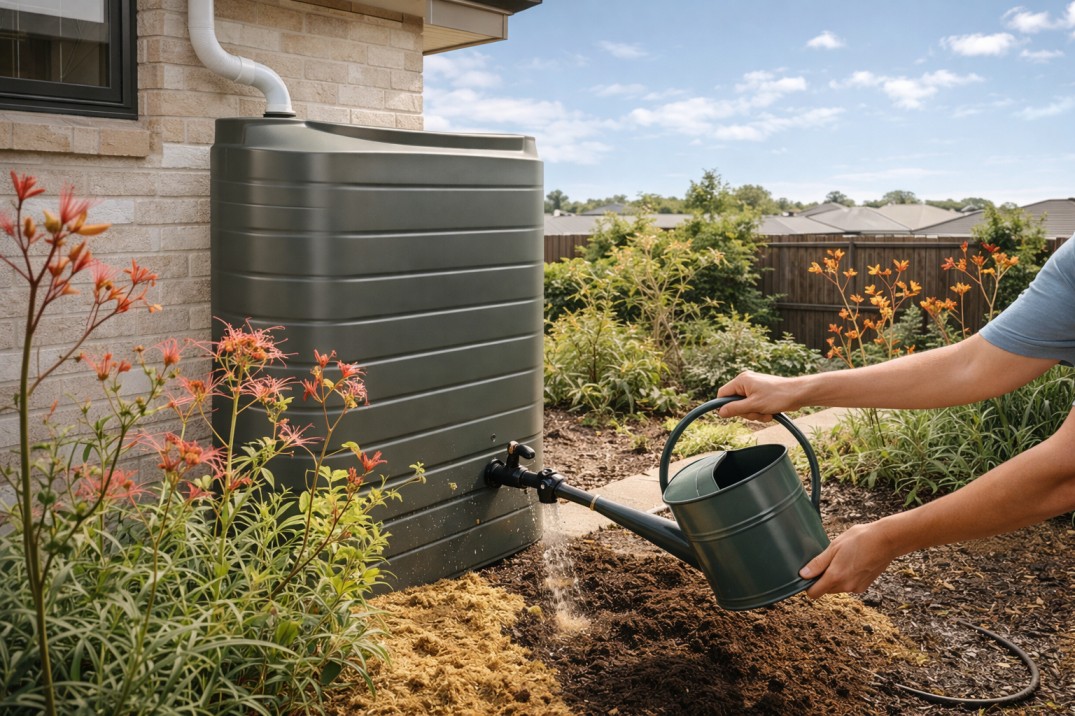
- Slimline Tanks: The hero of the suburban backyard. They fit perfectly against a fence or house wall, taking up minimal space while holding 1,000 to 5,000 litres. Modern colours like ‘Monument’ or ‘Woodland Grey’ help them blend in. We’ve done the research on the best rainwater tank for small backyards in Australia to help you choose.
- Round Poly Tanks: The classic workhorse. Great for larger spaces, often more affordable per litre of storage. Newer designs have a “squat” profile that’s more stable.
- Under-Deck Tanks: A genius solution if you have a raised deck. These flat, modular tanks turn wasted space into a hidden reservoir.
- How Big? A rough guide: 1mm of rain on 1 square metre of roof = 1 litre of water. The Bureau of Meteorology’s Climate Data Online tool can show you average monthly rainfall for your area to help calculate your potential harvest.
Pro Installation Tip: Always place your tank on a perfectly level, compacted base—usually road base or a concrete slab. An uneven base puts stress on the tank and can lead to failure.
Step 4: Integrate & Connect for Maximum Impact
A tank with a tap is good. A tank connected to your garden and home is transformative. This is advanced rainwater harvesting backyard Australia.
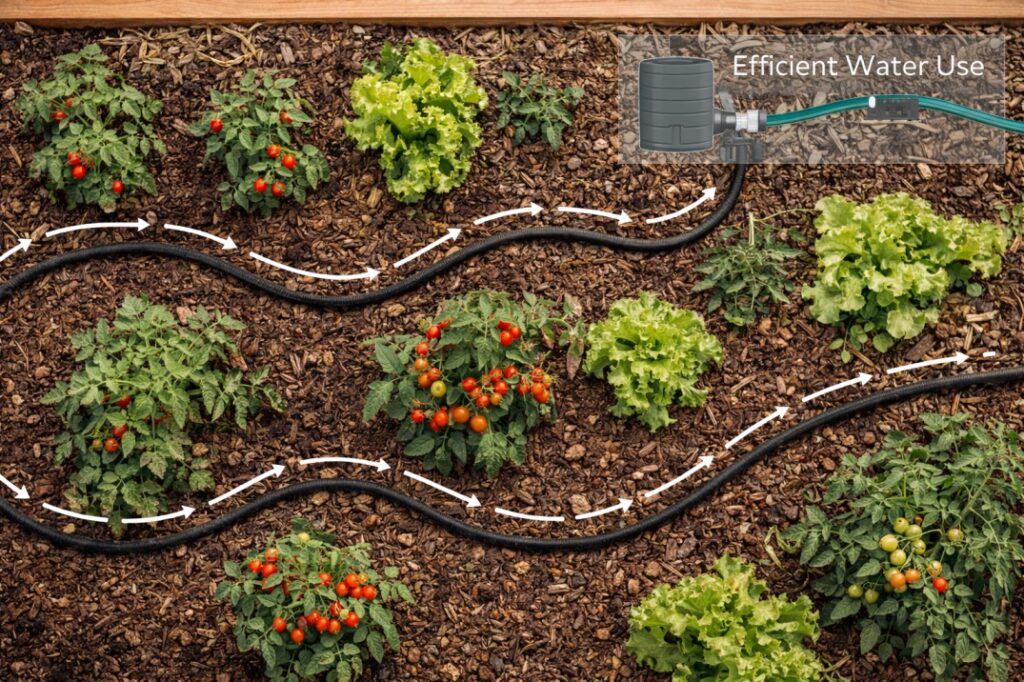
- Connect to a Drip Irrigation System: This is the ultimate marriage of water-saving technologies. The slow, targeted delivery of drip lines means almost zero waste. Connect it to a simple tap timer, and your garden waters itself at dawn with the purest water possible. It’s the perfect partner for a productive veggie patch in a DIY raised garden bed Australia.
- Plumb Into Your Toilet and Laundry: This is where you save huge amounts of mains water. It requires a pump and a licensed plumber to install a proper switching system. The plumber will ensure it’s compliant with Australian standards, preventing any cross-contamination with the mains supply.
- Don’t Forget the Accessories:
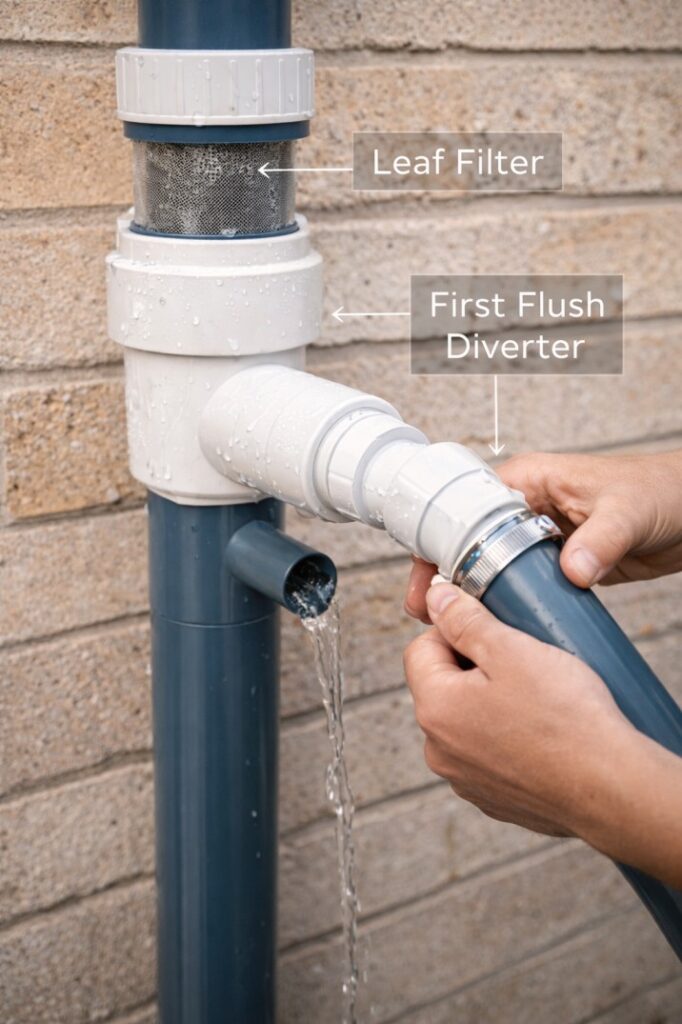
- First Flush Diverter: This simple device is non-negotiable. It discards the first, dirtiest 20-40 litres of roof runoff (with all the dust, pollen, and bird droppings), ensuring cleaner water enters your tank.
- Pump: For anything more than gravity-fed garden use, you’ll need a pump. A quality, pressure-sensitive pump will give you hose pressure from your tank. Listen for “quiet” models if the tank is near living areas.
Step 5: Create a “Sponge” Landscape with a Rain Garden
True rainwater harvesting backyard Australia isn’t just about tanks. It’s about designing your garden to act like a giant sponge. Enter the rain garden.
A rain garden is a shallow, landscaped depression designed to capture and slowly absorb runoff from your roof or driveway over 24-48 hours.
- How to Build One: Choose a low spot that naturally collects water. Dig a shallow bowl about 15-30cm deep. Fill it with a free-draining soil mix (sandy loam is perfect). Plant it densely with tough, deep-rooted native plants that can handle both “wet feet” and dry periods.
- The Perfect Plants: Think of species that love a drink. Lomandra longifolia, Carex appressa (Tall Sedge), Juncus amabilis (Rush), and Melaleuca ericifolia (Swamp Paperbark) are all champions. For a full list of hardy, water-wise plants, our guide to native plants for a sustainable Aussie backyard is a great resource.
- The Benefit: It reduces runoff, filters pollutants, recharges groundwater, and creates a beautiful, biodiverse habitat. It’s the ultimate in sustainable water management.
Step 6: Harvest Beyond the Roof – The Everyday Tricks
Rainwater harvesting backyard Australia is also a daily habit. It’s about catching every opportunity.
- The “Bucket in the Shower” Method: The cold water you waste waiting for the shower to heat up is pure, clean, and perfect for plants. A bucket in the corner can collect several litres a day.
- Redirect Downpipes: If your tank is full during a big storm, can you redirect a downpipe to flow directly onto a thirsty garden bed or lawn area? A simple downpipe redirector arm can achieve this.
- Swales on Slopes: If you have a sloping yard, a shallow, grassy ditch (a swale) dug along the contour can intercept runoff, slow it down, and let it soak in, rather than letting it rush away and cause erosion.
Step 7: Maintain Your System & Check for Rebates
A system ignored is a system that fails. Good rainwater harvesting backyard Australia practice includes simple maintenance.
- Every Few Months: Check and clean leaf screens and gutter guards.
- Twice a Year: Inspect your first flush diverter and empty it of debris.
- Listen to Your Pump: Unusual noises can mean a problem.
- Check for Rebates: Your investment might be subsidised. Local councils and some state governments offer rebates to encourage water saving. It’s always worth a quick search—our updated guide on rainwater tank rebates in Australia can point you in the right direction.

The Real Payoff Isn’t Just on Your Bill
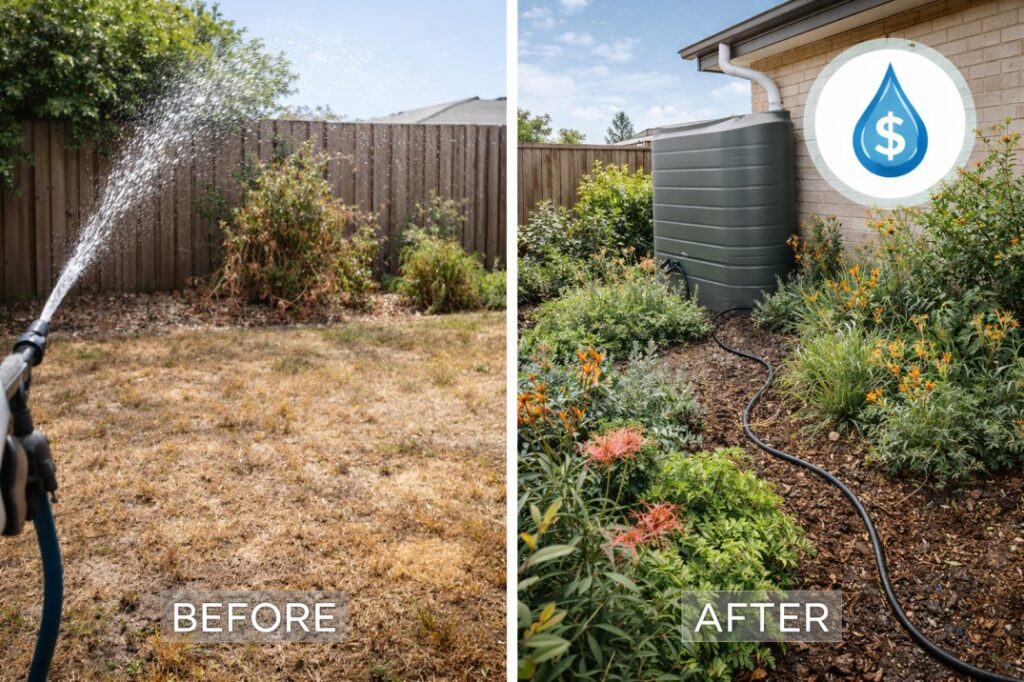
When I look at my rainwater system now, I don’t just see pipes and a tank. I see security. I see the moral satisfaction of using a resource wisely. I see my garden—once struggling—now thriving on nothing but sunshine and the rain we catch.
Starting your rainwater harvesting backyard Australia journey might feel like a small step. But it’s a profoundly powerful one. It reconnects you to the natural cycle of your local environment. It turns you from a consumer into a steward.
Begin where you are. Use what you have. A single barrel is a perfect start. Watch how your plants respond. Feel the satisfaction of that first watering can filled from your own supply. That feeling, more than any dollar saved, is what will have you planning your next tank, your next rain garden, your next step towards true water wisdom. The rain is coming. Will you be ready to catch it?
3 thoughts on “7 Brilliant Rainwater Harvesting Backyard Australia Strategies to Save Water”